Showing posts with label Indian. Show all posts

November 19, 2017

Garlic Naan


Naan is so delicious when one has it in a restaurant, I always thought it would be difficult to make. It turns out, however, that it's quite straight forward to make at home. If you can make pizza dough, you can make naan. Just a little tweak of the ingredients, and a change in cooking method, and boom! Naan at home, no tandoor oven required. I made mine in my cast iron skillet, popping each one into a warm oven as it came off the skillet while I finished cooking the rest.

Garlic Naan

Makes 8 small naan

175 mL warm (not hot) water
7 grams active dry yeast
2.5 cups flour (plus extra for shaping)
1/2 teaspoon kosher or other coarse salt
160 mL plain thick yoghurt
3 tablespoons butter
2 cloves garlic, crushed
canola oil
Nigella seed and/or dried fenugreek leaves (methi) to garnish

Melt the butter and add the crushed garlic. Set aside. Have a pastry brush at the ready for the final stage of cooking.

In a large (2 Litre) mixing bowl, sprinkle the yeast over the warm water, and let it activate - that is, come alive and start forming foamy islands on the surface of the water. Add about a cup of flour and the salt, and stir thoroughly with a wooden spoon until smooth.

Add the yoghurt and half the garlic-butter, and beat again until smooth. Start adding the rest of the flour and stirring it in until a soft dough forms. Turn the dough out onto the counter, and knead until smooth. You might need a little less or a little more flour than indicated here, depending on your baking conditions. The dough should be soft, but not too sticky.

Clean the mixing bowl and lightly oil the inside. Form the dough into a ball, and place it in the bowl, turning it to oil all surfaces of the dough. Cover with a clean kitchen towel and set in a warmed oven (with the light on is perfect) for about 45 minutes, or until doubled.

Start preheating a big, heavy skillet (preferably not non-stick - I used my cast iron skillet) over medium high heat. Place a baking sheet or pizza pan in the oven and turn it on to the lowest heat-setting to keep warm.

Turn the dough out onto the counter, and press the air out of it. Divide into 8 equal pieces, and shape each one into a loose ball.

Add a pinch of methi to the remaining garlic butter, if you wish.

Sprinkle a bit of nigella seed on one side of the work surface.

Sprinkle a bit of flour on the non-nigella side of your work area, and use your fingers to press the first ball into a thinnish round (not too thin, or it will tear) on the floured surface. Gently place the pressed-out dough over the nigella seed, and gently press down so that some of the seeds adhere to the surface of the dough. Lift the round of dough carefully, and transfer it seed-side-up to your hot skillet. Cook for a couple of minutes, and then carefully flip to its other side. I used tongs, which is a bit tricky in that the top part isn't really cooked yet. Cook for another minute or two, watching closely, and when brown patches show, flip it again. Brush a little garlic butter on the side with the seeds, and transfer it to the sheet in the oven to rest while you cook the remaining 7 naan in exactly the same way.

That's it. You're done. Serve with a nice wet curry, maybe something like Bengali Dal or Kali Dal.

November 12, 2017

Khichdi and Kheema


Khichdi (aka Khichri, and a number of other variations, खिचड़ी in Hindi) is a rice-and-pulse dish from India that is not only a vegetarian (vegan, in fact) staple, but also very likely the ur recipe for Kedgeree and possibly even Middle Eastern Koshary. It's been around for a long, long time, and is considered to be a very balanced meal on its own - even better, if you can serve it with condiments such as yoghurt or raita, chutney, or go all out for the famous Hyderabadi combination of khichdi, kheema, and khatta.

Kheema (aka keema, कीमा in Hindi) is essentially a simple, loose, ground meat gravy seasoned with accent vegetables and vigorous application of spices as pleases the cook. My kheema tends to vary quite wildly depending on what I have on hand, but is usually at least a bit spicy. Kheema is not generally by nature a vegetarian dish, but one could make it so by using the ground-meat substitute of your choice, or even simply finely minced vegetables. This one has a mixture of ground lamb and beef, as prepared by our local Turkish butcher. The recipe is below the recipe for the khichdi.

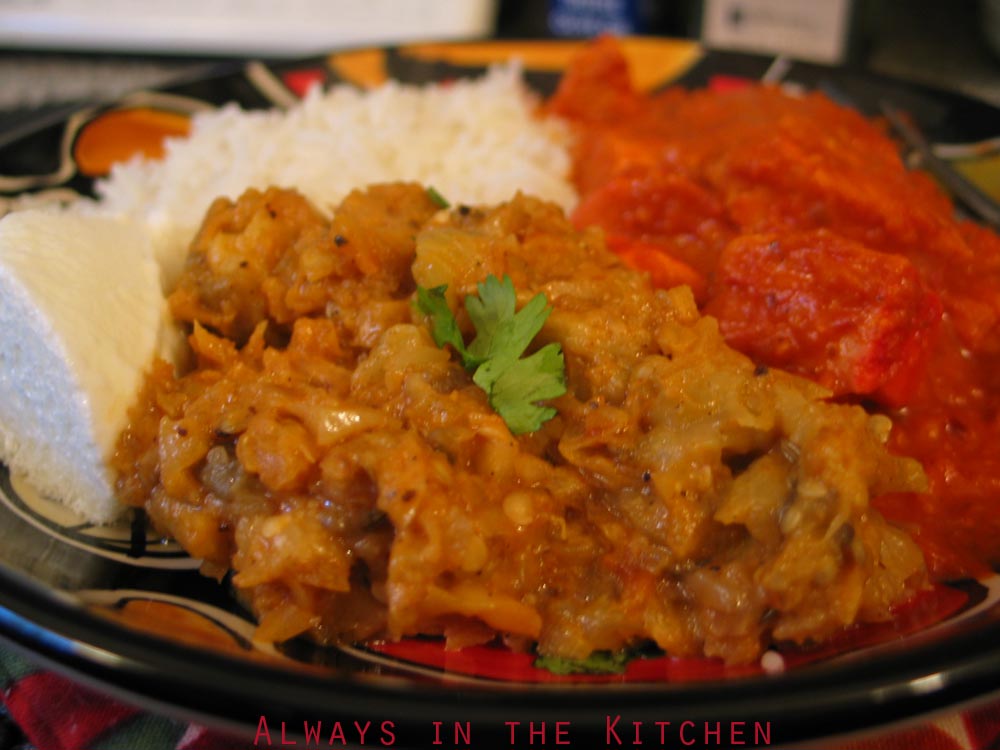
I didn't have the necessary sour ingredients on hand to make khatta, but we enjoyed the khichdi and kheema together.

There are different styles of Khichdi, ranging from the dry, pilau-like separate grains you see here to a more risotto-like dish, more of an extremely thick soup or congee than its drier pilau cousin. Because I was using a lentil that holds its shape very tenaciously, I decided to go with the drier style.

Khichdi can be made with any lentil, but this one is made with whole black urad dal - the same pulse that I use to make Kali Dal (black dal), and this dish is therefore Kali dal ki khichdi. Because the lentils give off a lot of dark colour when boiled, I discard the water used to boil the lentils, but if you don't mind a grey dish, you can certainly use the cooking water to also cook the rice.

Kali Dal Ki Khichdi

Serves 4

150 - 180 mL whole black urad dal, picked over and rinsed well
approximately 6 cups cooking water for the dal
1 teaspoon toasted cumin seeds
2 tablespoons minced fresh ginger
2 teaspoons oil or butter or ghee
1/2 teaspoon kosher or other coarse salt
1-3 dried red chilies, left whole OR 1 long fresh chili, seeded and chopped.
200 grams basmati rice
310 mL water for the rice, rinsed well

You don't need to soak the dal, but you can if you want to. You do need to wash them well, or your dish will be gritty.

In a moderately large pot, bring six cups (or so) of water to a boil. Add the well-rinsed dal, the cumin seeds, the chilies and the minced ginger, and let simmer gently for about 45 minutes, stirring from time to time. The water will be very dark and murky looking. If your dal is a bit old, or you're not convinced of its freshness (mine was rescued from the back of the cupboard), a small pinch of baking soda can be added to the water to encourage the dal to soften nicely as it cooks.

When the dal is tender, drain through a colander, and set briefly aside while you get the rice going: in a medium pot, bring the rice-cooking water and the well-rinsed rice to the barest of bubbles rising to the surface. Add the oil or butter or ghee, the salt, and the drained dal, stir through, and cover with a tight-fitting lid. Turn the heat immediately to the lowest setting, and cook undisturbed (no peeking!) for 15 minutes. Transfer the pot to a cold burner (or pot holder) without lifting the lid, and set the timer again for 15 minutes. When the timer goes, you may open the pot and fluff up your rice with a fork or rice paddle.


You'll notice that the dal have congregated in the top third of the dish, so give it a nice fold with a paddle or spatula to disperse them throughout the rice. If you want to serve it in a tidy shape, you can pack it into a small bowl or measuring cup and upend onto the plate or bowl. Otherwise, just spoon it into a bowl and enjoy - with or without accompaniments.


Plain yoghurt is a very common side, and if the khichdi is being eaten on its own, you may want to consider a tempering made from heating a little mustard oil (or butter or ghee) in a small pan, and adding some chili flakes, swirling them about until fragrant, before pouring over the khichdi. Because we were serving this with kheema, we didn't do that extra step.

* * * * *

A note on kheema vegetables: One of the most popular and traditional vegetables to add to kheema is green peas. If you're not using the peppers and/or tomatoes.


Simple Kheema

Serves 4

500 grams ground beef and lamb (both or either)
1 tablespoon butter or oil
1 tablespoon finely minced ginger
1 medium yellow onion, chopped (about a cup's worth)
2 cloves garlic, sliced
1 teaspoon toasted cumin seeds
1 teaspoon ground coriander seed
1/2 teaspoon ground cardamom
1/2 teaspoon ground black pepper
1/2 teaspoon kosher or other coarse salt
3-4 roma-type tomatoes, cored and seeded, sliced into strips
1-3 red or green hot peppers, cored and seeded, sliced into strips
1/2 teaspoon garam masala
Water, as needed
1 teaspoon cornstarch or 1 tablespoon flour as a thickener (optional)
Cilantro to garnish (optional)

In a large skillet, heat the butter (or oil) over medium-high heat, and when it has melted and foamed out, add the ground meat. Stir and cook the meat, breaking it up with your spoon as you go (it can be as fine or coarsely broken up as you like) until it is thoroughly browned (not just no-longer-pink, you want some golden, flavourful searing on about half of it). Add the salt and the spices (except the garam masala) and stir through again. Add the onions, garlic, and ginger, and continue to stir and fry until the onions are translucent.

If you want a thicker gravy, choose either the cornstarch or wheat flour option (see instructions below) add it now and simmer for about 15 minutes. If you want a thinner gravy, simply add an extra half cup of water now simmer for about 5 minutes.

Add the hot peppers and the tomatoes (if it looks like it needs more water to be a nice gravy texture, go ahead and add a little more), and cook a few minutes longer, stirring frequently, until the vegetables are just tender. Garnish with cilantro if you like.

Thickener Options:

Cornstarch: mix the teaspoon of cornstarch with a half-cup of room temperature or cold water, stir until smooth, and then add to the pan. Stir throughout, and watch it thicken the gravy as it comes up to a simmer.

Wheat flour: mix the tablespoon of flour with a cup of room temperature or cold water by shaking together in a tightly lidded cup. Pour the liquid into the pan and stir throughout, and watch it thicken the gravy as it comes up to a simmer.


January 21, 2017

Matar Paneer


This is my version of the famous northern Indian vegetarian curry featuring peas (matar or mutter, amongst other spellings) and fresh cheese (paneer). It is a little less rich, and a little less complex than a lot of the versions out there, but that just makes it easier to put on the dinner table on a weeknight.

Obviously it is much more time consuming if you make the paneer yourself, but since I was able to find some in a shop here (hurrah!) I've gone the easy route. You can make the paneer cubes any size you want, although if they're much smaller than sugar-cube, it will be more troublesome to fry them. The cubes shown here are actually a bit on the large side, and probably could have been halved. The recipe works either way. You can also skip the frying stage, but it does lose some of the flavour and texture that make the dish special.

I think it's one of the better things you can do with frozen green peas.

Matar Paneer

Serves 4

350 grams paneer, diced
3 tablespoons peanut oil, divided
1 large onion, finely chopped
3 cloves garlic, finely chopped or pressed
1 inch fresh ginger root, finely chopped
3 tomatoes, deseeded and diced
1 teaspoon cumin seed
1 teaspoon coriander seed
1 teaspoon ground cumin
1 teaspoon ground coriander
2 teaspoons garam masala, divided
1/2 teaspoon turmeric
1 teaspoon coarse salt
1 tablespoon tomato paste
1-2 hot green chiles, minced
250 - 325 mL water
200 grams green peas, rinsed under warm water if frozen
3 tablespoons heavy cream

As usual with Indian cuisine, I find it essential to complete all of the prep before starting cooking. Mise en place is peace of mind.

In a large, non-stick skillet over medium heat, heat 2 tablespoons of the peanut oil until shimmering. Add the cubes of paneer, quickly placing them one at a time rather than dumping them all in at once, and sear until slightly browned. Use tongs or a fork to turn the cubes over to brown the other sides. I confess to being lazy, and that I only browned three or four sides for each piece, so that works, too. Remove the finished cubes to a holding plate.

In the emptied skillet, still over medium heat, add the remaining tablespoon of oil, and also add the whole cumin and coriander seeds. Stir them around a bit, and let them toast in the hot oil for a minute or so before adding the onion, ginger, garlic, and salt. Stir and fry until translucent, add the minced green chiles, and continue to stir and fry until the onion bits are well browned. Then add the turmeric, ground cumin, ground coriander seed, and half of the garam masala. Stir the spices through, and then add the tomato paste, and stir that through, also. You can add a tablespoon or so of water if it's really getting difficult to stir. Add the diced tomatoes, and stir and cook for about ten minutes or so, or until the oil starts to separate out from the mass of vegetables. Slowly stir in 250 mL water, and stir and cook until it is a grainy gravy.

If your pan is deep enough, you can use an immersion blender right in the skillet, but if not, remove the coarse sauce to a blender-cup or food processor and process until it becomes a smooth gravy. Return to the skillet (I don't bother to wipe the skillet out in between), and let it return to a gentle bubble. If the mixture is too thick, you can add the extra water but go slow, just adding a bit at a time until you get a gravy consistency you're happy with.

Add the peas to the skillet and stir through. Add the fried paneer cubes, and gently stir through. Cover the pan and turn the heat to low, and let simmer for about ten minutes, or until the peas are cooked and the paneer cubes are heated through. Remove from the heat and stir through the heavy cream and the other half of the garam masala. Garnish with cilantro if you wish. Serve with or over basmati rice.

A note on recipes calling for only a tablespoon or two of tomato paste: if you normally buy tomato paste in cans, you might want to consider picking up a tube of tomato paste instead - unlike the cans, they can be stored in the fridge once opened and are perfect for dispensing only a small amount of tomato paste at a time. You can usually find tomato paste in large tubes in Italian delis or specialty shops, if they're not on your usual supermarket shelves.

March 28, 2016

Hot-Smoked Salmon & Fennel Kedgeree


A few weeks ago, we received a care package that contained two tins of hot-smoked wild fish from my home province of British Columbia: one BC sockeye salmon, and one BC albacore tuna. I don't have a huge repertoire of fish recipes - if you check out the seafood tag, you'll see mostly prawns, with only a few non-crustacean offerings. So, I've been thinking quite a bit about what to make with this unexpected bounty. The last time I had smoked tuna, I made Smoked Tuna Noodle Skillet Dinner, and the only salmon recipe I've posted is Salmon Corn Chowder.

I decided to use the salmon first. I did a little research online, asked friends on Facebook for suggestions, and even deliberated reworking previous recipes to use fish, but I wanted to make something new and interesting. Finally I remembered Kedgeree, a dish that had always caught my fancy for not only its interesting name but its entire multicultural history. I knew that most Kedgeree recipes call for smoked haddock or sometimes smoked mackerel, but I reasoned that the flavours should also be compatible with hot-smoked sockeye salmon.

Kedgeree is an Anglo-Indian dish, broadly considered to be descended from the South Asian class of rice-and-legume dishes called Khichri (also spelled Khichdi, kitchiri or khichuri, amongst other spellings), whose other culinary offspring might include Egyptian Kushari. Like its parent, Kedgeree has a lot of built in variability - wet or dry, whether you use ghee or oil, curry powder or separately blended spices, what kind of smoked, flaked fish, whether to include raisins. I went with a somewhat drier style, constructed more like a fried rice than a biryani, rice porridge or paella.

This qualifies as a skillet dinner if you have leftover rice to use.

Hot-Smoked Salmon & Fennel Kedgeree

Serves 3 - 4
Total Prep & Cooking Time: 20 minutes (if starting with cooked rice)

3 cups cooked basmati rice, fluffed and cooled, grains separated
4 tablespoons butter, divided
1 small yellow onion, chopped finely
1 small fennel bulb, trimmed and finely sliced (fronds reserved)
4 cloves garlic, sliced
1 red chile, sliced
1 tablespoon Madras-type curry paste
1/2 teaspoon ground cumin
1/2 teaspoon ground coriander seed
1 170 gram tin of hot-smoked wild sockeye salmon
2 boiled eggs
Fresh cilantro leaves
Freshly ground black pepper
Juice of half a lemon

If you need to cook rice from scratch for this recipe, it takes about 1 cup / 200 grams raw basmati, cooked however you like to cook rice. For optimal length and separation of grains, soak the rice in the cooking water for an hour or so before cooking. Be sure to separate the cooled grains of rice with your fingers (or a fork) before adding to the skillet.

Prepare your vegetables. Open and drain the scant liquid from the tin of salmon. Peel the boiled eggs, and slice them lengthwise into quarters. Tear up the fronds of fennel and put them with the cilantro for garnish.

Melt 2 tablespoons of butter in a large, non-stick skillet. Once it has foamed out, add the chopped onion and sliced fennel, and stir and sauté until translucent and the onion is starting to brown at the edges.

Add the curry paste and cumin and coriander seed, and stir through. Add the sliced garlic, and continue to sauté for a couple of minutes. Add the remaining 2 tablespoons of butter and stir until it has melted. Add the rice and half the red chile slices, and stir fry until the rice grains are all well coated with the buttery spices.

Add the salmon, breaking it into large and small chunks with your fingers. Stir gently through the skillet, so it doesn't break down entirely (unless you like it that way). When the salmon has been integrated and warmed through, serve in shallow bowls, garnishing with the remaining chile slices, the quartered eggs, the fennel fronds, and the cilantro leaves.
Finally, squeeze a little fresh lemon juice over each bowl.

We served this with kalonji (nigella seed) studded roti, but this would also be excellent with a bowl of dal on the side (and would feed more people). If I had thought of it in time, I would have served a dollop of curried eggplant chutney, too.

Kedgeree can be eaten hot or cold, and it was reported that this one heated up very nicely in the microwave the next day.

August 26, 2015

Chicken Tikka Masala


There are a lot of origin stories about Chicken Tikka Masala, and a lot of claims to ownership. As far as I can tell, there's no way to even verify which country the dish originated in, let alone the specific claimant.

Some folks will tell you that this is not a proper curry, but that is quite ridiculous. It may not be a historical dish, but it's in no way illegitimate because of that. It's delicious and acceptable and popular. At it's heart, it is derived from an Indian tandoori dish called Chicken Tikka - marinated chicken cooked in a tandoor (Indian clay oven), although according to Wikipedia, the Punjabi version is simply cooked over coals. The chicken is usually marinated in yoghurt and spices, and is typically cut into chunks and cooked on skewers. Where the masala bit comes in, is when you take a perfectly good (or maybe a little dry?) Chicken Tikka, and simmer it gently in a spiced tomato sauce, enriched with yoghurt at the end. There are, of course, many iterations, including one of the origin stories, which claims that an undiluted can of Campbell's Tomato Soup was the base of the sauce.

There is likely no place on earth where Chicken Tikka Masala is more popular than the UK, where it appears to be fast approaching (or even edging out) the traditional Sunday roast as most beloved national dish. You can get Chicken Tikka Masala pre-packaged sandwiches in the Tesco, which gives you an idea of the market penetration of the dish.

Versions of Chicken Tikka Masala that are made using commercial Tandoori paste often have a pink tone to the gravy and the outer surface of the chicken itself. Since that is derived using a food colouring that I don't usually have in my kitchen, I skipped it and simply went with a turmeric-forward spice mixture that is often used for Chicken Tikka. If yours must be pink, skips the spices listed below in favour of the commercial paste, and slather the chicken pieces liberally with it.

I don't have a tandoor oven, which is probably no surprise, nor do I have a kitchen set-up conducive to cooking with coals. This is my home kitchen version, adapted from many different sources, but this one from Palachinkablog in particular.

Chicken Tikka Masala

Serves 4

2 tablespoons ghee or vegetable oil, divided
400 grams boneless chicken, in chunks
2 tablespoons turmeric
2 tablespoons ground cumin
1 tablespoon cayenne
1 teaspoon ground coriander seed
1/2 teaspoon kosher salt
1 large onion, grated
4-5 cloves garlic, pressed
1 inch fresh ginger, grated
500 mL tomato passata (or unseasoned tomato purée)
1/2 teaspoon sugar (optional)
1 cup full-fat plain yoghurt
1 tablespoon cornstarch

As always with Indian food, prep your mise en place completely before you start cooking. Put your basmati rice on to soak in its cooking water, too. Start to cook the rice just before you start to cook the chicken (unless you are using a rice cooker, in which case, time it to be ready when the chicken is done - about a 35 minute total cook time).

Combine all of the dry spices except the salt, and toss the chicken pieces in the mixture until they are all nicely coated. Set aside. You can do this in the morning, or at any point during the day, but bring back up to room temperature before cooking.

In a large skillet or a dutch oven, heat half the oil or ghee very hot and sear the chicken in batches, without cooking through, and remove the chicken to a holding plate as you go. When all the chicken is seared, add the rest of the oil and the grated onion, pressed garlic, and grated ginger, and any accumulated juices therefrom. Stir and scrape the pan, add the salt, and continue sautéing the onion mixture for about 5 minutes or so until just tender. Turn down the heat to medium-low and add the passata, and stir and scrape to ensure that the bottom is free of any stuck-on bits. After a couple of minutes, taste the sauce. If it is a little bitter from the tomato addition, add the sugar. If not, just proceed.

Add the seared chicken (and any residual spices) into the sauce, and turn the heat to its lowest setting. Let the chicken simmer very gently for 15 - 20 minutes. Take the pan off the heat. Combine the yoghurt and cornstarch and stir until smooth. Add a bit of the tomato sauce to the yoghurt, and stir it in, before adding all of the yoghurt mixture into the dutch oven. Stir through, watching to colour lighten and turn orangey. Cover and let the residual heat cook the cornstarch for about five minutes - just enough time to fry up some Indian-spiced Cabbage on the side, or make a fresh chutney or maybe a grated carrot salad, since your grater is already out. Your rice should also be done (and waiting patiently). If you happen to have some cilantro on hand, that would make a very nice garnish.

May 15, 2013

Kali Dal (Curried Black Lentils)


You can use a variety of different lentils to make this - the version shown here is made using whole urad dal (aka black gram), which is traditional, but you can also use black beluga lentils, and even mung beans. You can also make it with or without rajma (red kidney beans). I enjoy including the rajma for the contrast in size, texture, and colour.

You can add melted butter and/or cream or yoghurt to finish this dish (making it, in effect, a Dal Makhani), but it is delicious as is - and vegan, to boot. Perfect for entertaining your vegetarian friends. Make lots - it freezes well and reheats wonderfully for a future lunch or dinner. It thickens slightly once it cools, so if you like a wet dal, you may wish to add a little bit of water to loosen it up (wait until it is reheated before adding any water, as warming it up will also loosen it a bit). You can also make this very wet (simply by adding more water) and serving in small bowls as part of a thali, or as a first course.

Be sure to wash your urad dal very well, in lots of fresh water. A bit of grit will make the whole pot disappointing.

Kali Dal

Serves 8 (with rice or bread)

1 cup black lentils (urad dal or similar)
1/2 cup red kidney beans
6 cups water
1 thumbs-length fresh ginger, minced (divided)
1 teaspoon cayenne powder
2 teaspoon garam masala

Tempering:
2 tablespoons vegetable oil
2 teaspoon whole cumin seeds
1 medium onion, finely diced
8 cloves garlic, minced or crushed
4 fresh tomatoes, peeled and diced
1 teaspoon kosher salt


Pick over lentils and kidney beans to remove misshapen, discoloured or otherwise irregular lentils and any foreign matter (little rocks, plant stems, stray bits of grain, etc). Rinse thoroughly, with several changes of water to remove any grit or dust.

Place lentils in a heavy pot with the water and the cayenne and half the minced ginger, and bring to a boil. Reduce the heat to a medium-low simmer, and skim any foam from the top. Allow the lentils to simmer gently, covered, until kidney beans and lentils are tender – 45 minutes or a bit more, if you have older lentils. You can do this ahead, and let it sit overnight or for a couple of days in the fridge, before proceeding to the next step. At this stage, the lentils look pretty unappealing (and kind of grey-ish), but their appearance will improve greatly with the next step.

In a medium-sized skillet, heat oil over medium-high heat. Add the cumin seeds, giving the pan a shake to distribute. As soon as the cumin starts to pop, add the onions and garlic and the rest of the ginger, and fry gently until the onions have softened and started to brown. If you like your food very spicy, you can add extra cayenne to taste at this point. Next, add the diced tomatoes and salt, and stir until they give up their liquid - often they turn the onions a pretty golden colour - and scrape the mixture into the lentil pottage. Use a spatula to get every last bit. Simmer for about 15 minutes.

Add garam masala powder and simmer on a low heat for 15 minutes. If you are adding dairy, add up to half a cup of half-and-half (or plain yogurt) and let simmer for another five minutes (or until heated through). You can keep this warm, on the heat, for a long time, as long as you stir it once in a while to make sure it doesn't scorch on the bottom.

Taste and adjust for salt to your preference.

March 24, 2013

Tandoori Turkey Meatball Rice Bowl

I confess that I'd hoped that these would be more colourful than they turned out - my masala blend was months old, which I suspect was the problem, and I should have compensated by adding a little turmeric and an extra hit of kashmiri pepper, by the looks of it. However mild in appearance, though, these were absolutely delicious, and made a satisfying dinner.

That being said, these were remarkably easy to make. My standard Pork & Turkey Meatballs got an Indian inspired, all-turkey facelift, replacing the usual herbs and spices with a generous amount of tandoori masala, and using egg white instead of whole egg (I had some to use up).

I scooped the meatballs using my 60 ml disher, and baked them off on a foil-lined baking sheet for 25 minutes:


While they were in the oven, I made a simple pulao, using this Times of India Online recipe for Pulao in a Jiffy The pulao was nice, but overall a little soft, I thought - I used carrots and cauliflower from the recommended vegetables listed, but either I diced them too finely, or used too much water, because they were a little softer than I expected. Not outright mush, you understand, but a bit too soft. I generally find that I need less water when I'm cooking rice than most recipes call for, and that may be the case here - I'm not sure why - some sort of combination of being essentially at sea level, and having very soft water, perhaps? In any event, if I were to make this recipe again, I might go with both larger cut vegetables and a smidge less water. I'd probably throw in a few peas, and an extra few pods of cardamom, too.

When the meatballs came out of the oven, they got a quick brush with hot mango chutney, which went beautifully with the spicy flavour of the meat. As you can see, I also knocked together a quick cucumber and onion raita, and put an extra bit of chutney on the side.

This was a fun dinner (and lunch the next day, and extra meatballs in the freezer for a future rainy day) and while I want to tweak both the pulao and the seasoning of the meatballs (to amp them up into a more deeply fragrant and colourful result), I'm quite looking forward to version 2.0.


March 04, 2013

Sweet & Sour Balti Chicken


The most shocking thing about this dish is how quick and easy it is. The second most shocking thing is how delicious it is. The only reason for those two things to be in that order is that you have to make it before you can taste it. Fortunately, that doesn't take long.

Many Indian recipes seem daunting, because they contain a laundry list of spices (possibly some obscure, if you don't have a large spice collection), and a great deal of chopping. Most shortcuts involve pre-packaged sauces that, while convenient, never seem to deliver the right intensity of fragrance that one gets from cooking from scratch.

Now, I should confess straight away that there is in fact a convenience item that makes this whole thing work. If you're fanatical about doing everything from scratch, go ahead and make your own hot mango chutney (I suppose you'd need to make your own tomato paste, too, in that case, but your mileage may vary). If you just happen to have some of your own mango chutney jarred up from a canning session, or lurking in the fridge from a recent previous endeavour, then use that (and I salute you!), but you get a pretty good result from a quality store-bought chutney.

This dish isn't precisely sour in the vinegary way that Chinese sweet and sour can be, but the mango chutney (and the yoghurt) give it a tanginess that skews to the sour side of the palate and offsets the sweetness beautifully. You may want to serve a vegetable side dish (or an aggressive array of side condiments). I recommend curry-roasted cauliflower florets, banana (raita or pachadi), or carrot raita to get some more vegetable matter onto your plate, but you could also add some quick-cooking vegetables, such as peas, half-way through the simmering time.

If, like me, you don't have a balti pan, you can use a wok, which is very similarly shaped. Failing that, you can use a large skillet, which works just fine.

Sweet & Sour Balti Chicken

Serves: 4
Total Prep & Cooking Time: 20 minutes

750 grams chicken (boneless, skinless)
3 tablespoons tomato paste
2 tablespoons plain Greek yoghurt
1 ½ teaspoons garam masala
1 teaspoon cayenne pepper
2 cloves garlic, crushed
2 tablespoons hot mango chutney
½ teaspoon kosher salt
1 teaspoon sugar
3 tablespoons canola oil
¾ cup water
1-2 serrano peppers, thinly sliced
¼ cup cilantro
2 tablespoons Half & Half / light cream

In a medium bowl, combine the tomato paste, yoghurt, garam masala, cayenne, crushed garlic, mango chutney, salt and sugar, and stir until smooth. If your chutney has huge pieces of mango, you may want to chop them up a bit, otherwise leave any chunks whole.

Dice the chicken into bite-sized pieces.

In a large skillet or wok, heat the oil over medium and scrape the tomato-yoghurt mixture into the hot oil. Stir gently but thoroughly, reduce the heat and cook for about 2 minutes, stirring occasionally. The paste and the oil will not truly integrate, but remain partially separated - that's okay.

Add the chicken to the pan, and stir to coat evenly with the tomato mixture. Add the water, and stir gently until the sauce becomes smooth and liquid. Simmer for about 8 minutes, or until the chicken pieces are cooked through and the sauce has thickened slightly. You may lower the heat and add a lid if the sauce is becoming too thick, or add another tablespoon or two of water.

Add half of the serrano chile slices and the light cream, and cook for 2 minutes, stirring gently.

Serve garnished with the remaining chiles and roughly chopped cilantro.


June 02, 2012

Aloo Matar (Dry) and Samosa Pie


My generalized dislike of green peas is almost legendary in my family, even though by age 10 or so I had conceded that peas in the context of a dish that was not only about the peas was entirely acceptable. I fell for snap peas and snow peas early and hard, as most kids do, but the pyramid of naked green peas as the vegetable du jour remains on my least beloved list. Split peas, however, were never on my bad list, as I've always categorized of them more as a lentil than anything else.

When I cook with peas, I tend toward using snow peas or snap peas, and I like them equally well (slightly) cooked or raw. I don't usually buy frozen peas, because I have so little use for them. However, I can think of a few uses for peas where they really shine, and the dish wouldn't be the same without them: 1) My mother's Spring chicken noodle soup, 2) raw in a salad or straight out of the garden (shelled, of course), and 3) potato-pea samosa filling.

Lately, I've found myself eyeing every restaurant listing for samosas that I can find. I prefer to know ahead of time what style of samosa is available, so I usually need to ask questions. Phyllo is not my favourite pastry for the samosa oeuvre, nor is puff pastry - the first being too shattery (or leathery), and the second being too rich and too thick. Since I am both fundamentally lazy and afraid of frying things, I decided that I should simply make one big samosa - i.e. a pie - using my usual all-purpose pastry shell, and make up my own filling: potato and pea, of course - my favourite samosa.

Having never made samosas before, I started looking at recipes for fillings and concluded that they were simply a dry aloo matar (mattar, muttar, mutter), and simply made up my own recipe as I went along. I was thrilled with the filling, and happily mounded it into the pie crust to bake in the oven.


The samosa pie was quite pretty, I think, and absolutely delicious - with one caveat: the peas were overcooked. Now, this wasn't the end of the world (although overcooking peas is a kind of tragedy) largely because I have an aggressive hand with the seasoning, which concealed some of the sins of overcooking. Now that I've considered the problem (and re-heated leftover pie a few times) I think I have the solution. Cook everything but the peas, allow the filling to cool, stir in frozen peas, mound into pastry shell and bake. As I was starting with a hot filling, and then baking it at 425 F for 45 minutes, of course the peas got overdone. But with a pre-cooked, cool or cold filling, and frozen peas, the outcome should be much better. I will be sure to report back when I try it again.

If you are not making pie, however, and just want a delicious, substantial dry curry, follow the directions for the peas below.

Aloo Matar

Serves 6—8

4 large yellow potatoes (about 2.75 lbs / 1300 g) peeled and diced medium
1/2 red onion, finely diced
1 cup frozen peas
2 cloves garlic, minced or pressed
1 tablespoon olive oil or mustard oil
1 teaspoon cumin seeds
1 teaspoon ground cumin
1 tablespoon masala of your choice (garam, tandoori, madras, etc.)
1 teaspoon yellow mustard seeds
2 teaspoons ground coriander seed
1 teaspoon ground cardamom
1/2 teaspoon cayenne (or more)
1/2 teaspoon ground ginger (or equivalent fresh)
pinch of ground cloves
1/2 teaspoon kosher salt (less if your masala contains salt)
pinch of turmeric if you want a yellow-y colour boost (not pictured)

Set the peeled and diced potatoes to cook until tender - about 10 minutes for simmering. Meanwhile, in a large skillet, heat the olive oil and saute the onion and garlic until translucent. If you want, you can add some finely diced hot chiles here, too. Add the cumin seeds and mustard seeds, and about half the rest of the seasonings (you can mix all of the ground seasonings together beforehand). Add the frozen peas, stir and saute until the peas are all nicely covered with the oily spices, and either turn off the burner or set on a very low flame until the potatoes are ready. When the potatoes are fork-tender, drain them in a colander and spoon them into the skillet. Sprinkle the rest of the spices evenly over the potatoes and, using a spatula, carefully fold the potatoes through the peas mixture until everything looks evenly distributed. Serve with mango or tamarind chutney.

As always, feel free to tinker with the spices to best suit your tastes.

For Samosa pie, make the filling as above, omitting the peas. Cool the potato filling, stir in the frozen peas, and mound into the pastry shell of your choice. Bake at 450 F for 40 - 45 minutes, checking periodically, or until the crust is a lovely golden brown. For gluten free and/or vegan, you will need to accommodate those factors in your choice of pie crust, naturally, but the filling meets both requirements on its own.


July 16, 2011

Butter Chicken Revisited

I first posted about butter chicken a few years ago (see link). Butter chicken is probably the single most popular dish in Indian restaurants in Vancouver, which is actually a little bit sad, because it means that almost every restaurant (don't worry, I do know there are exceptions) feels the need to keep one on the menu, however indifferent to it they might be. I've had a fair number of wretched ones, and almost never order it out, anymore. The good news is that it is a very easy dish to make, although the recipe looks a bit daunting. Some of that is the list of ingredients, but in all fairness most of those are spices.

I've updated and streamlined my recipe since the original one was posted on my old, non-blog recipe site (here).

Butter Chicken (2011)

Serves 4 - 6
Total Prep & Cooking time: 45 to 60 minutes

8 boneless, skinless raw chicken thighs
2 tablespoons hot tandoori masala
14.5 oz / 398 ml can diced tomatoes, with juices
2 tablespoons butter
2 tablespoons canola oil
3 bay leaves
1 inch of ginger root, peeled
3 large cloves of garlic
1 medium onion, roughly chopped
1/4 teaspoon cayenne pepper
1/4 teaspoon sugar
1/2 teaspoon kosher salt
2 tablespoons natural cashew butter (unsalted)
1 cup milk
1/2 cup water
1/2 cup cream
1/2 teaspoon garam masala
cilantro to garnish optional

Sprinkle tandoori masala evenly on both sides of the skinless chicken pieces and let them rest while you prepare the rest of the ingredients.

Prepare and measure out all ingredients ahead of time: this is not a chop-as-you-go endeavour. Use little bowls or plates to get organized. Items that are added at the same time can be put in the same bowl.

Ginger, garlic and onions can be finely ground together in a blender or food processor. You want them very finely minced, but not completely pureed. Scrape down the sides as necessary, to ensure a fine texture. Remove to a bowl, so they're ready to add when needed. Puree the tomatoes separately, with their liquid, and put them in a separate bowl (an immersion blender works well for this.

Heat the butter and oil in a large, non-stick skillet over medium heat, until the butter is melted and the pan is hot. Add the bay leaves, the onion/ginger/garlic paste, and fry, stirring often, until golden brown and all water has evaporated. Don't let it burn. Add the tomato puree, chile powder, salt and sugar, and fry until the water has all evaporated and the oil separates out into shiny orange-y droplets. This can take up to 10 minutes, so be patient and stir a lot. The mixture will be quite thick, almost dry.

Add the cashew paste and continue to stir and fry another few seconds, and then add the milk and water slowly, stirring the whole time, and raise the heat to bring the mixture to a boil. The sauce should be thick and almost custard-y in texture. You can always add more water later, if needed.

When the sauce has come to a boil, turn the burner to low. Shake any excess tandoori masala from the chicken, and slide the pieces gently into the pan, and spoon the sauce over each piece. Cover and simmer very gently for 25 minutes (you can also do this in the oven at 350℉, if you need the stovetop), stirring half-way through. Remove the chicken pieces carefully from the sauce and roughly chop the meat into large bite-sized pieces. Return the chicken pieces to the pan and stir into the sauce. Over medium heat, add the cream and garam masala, and cook for a further 5 minutes, until heated through. Garnish with cilantro, if you like.

I should also note that the sauce freezes beautifully, should you have any left (or if you only have a smaller amount of chicken - you can still make the whole recipe of suace, and then freeze the leftover). When you want to use it, simply defrost and heat in a skillet, slide more masala-rubbed chicken into it, simmer, and serve. Just like one of those ready-to-use sauces, but at a fraction of the cost, and much, much better.

The sauce on its own would make a pretty awesome pizza sauce, don't you think? Leftover chicken can also be mixed with rice and vegetables (curry-roasted cauliflower, for example) and wrapped in a roti or tortilla as a freezer-friendly stash of homemade goodness.

While not strictly correct, I've also had good luck substituting quality peanut butter for the cashew butter. I'm currently very impressed by the Nuts To You organic smooth peanut butter (unsalted), which may be the best I've ever had.

June 26, 2011

International Bento (India): Cauliflower & Green Bean Korma

It's bento time again! This is a big bento box for a big appetite. It's sleek, matte black, and has a built in storage compartment for your chopsticks as part of the lid in the airtight top section. We call it the Ninja Bento Box, for obvious reasons. This bento was packed after the curry had cooled, so the sauce looks thicker than it really is when it is freshly made or re-heated.

I was surprised to realize that I hadn't actually done an Indian bento yet. While this is one of the simplest types of bentos imaginable - an inelegant arrangement of leftovers, really: some rice on one side (basmati, of course - not only appropriate to the cuisine, but also our default rice), and vegetable korma on the other.

The korma recipe is one that I have posted previously here, back in 2006. I haven't changed it much, except that I now often remove the cardamom seeds from the pods before throwing them into the pan, so that I don't need to fish them out later, and I puree the sauce before adding the featured ingredient. This korma was simply trimmed and sliced green beans, and cauliflower florets, thrown in at the point where one would usually add chicken or tender lamb. You can use any vegetable you like, of course, such as this version here from 2007, which included chickpeas, broccoli, bell pepper, carrots, and homemade paneer. The sauce is just that versatile - it can be meaty, vegetably, or some combination depending on your whim (or the state of your fridge).

Cauliflower takes to curry like the proverbial duck to water. It doesn't seem to matter what kind of curry, perhaps because cauliflower is such a mellow flavour to begin with, but it soaks up any sauce you put it in like it was especially designed to do so, and it doesn't suffer from significant texture loss when you re-heat it, which is a real bonus for packing up the leftovers as lunch.

I was a little startled to discover that I've been making this recipe regularly for five years now. It's my go-to when I want a homemade curry but don't have the energy or adventurousness to try something new or tricky, or if I'm just in the mood for something dependably comforting.

January 09, 2007

Too much milk

What do you do when you unexpectedly have much more milk left in the fridge than you anticipated? Well, if you're not prone to sitting down to a big glass of milk and are not in the mood for a rice pudding, you make paneer. Or, at least, I did. Oh, I had big plans for that milk: eggnog (some of which actually did go toward making eggnog, I confess), white lasagna (maybe next month...), bechamel for moussaka, and even cereal, which I am not terribly prone to, most mornings. However, the milk was skittering rapidly toward its expiry with none of these things having been made. Paneer was the fast, easy option. And paneer, of course, meant curry:


It's not difficult to make paneer. Heat milk until just boiling, turn off heat, and add a tablespoon or two of lemon juice. Cover, let stand for 15 minutes or so, and strain. Place a weight on the reserved solid curds, and the next day you have a nice brick of paneer. Even when you forget to weight it (ahem), paneer is delicious and easy to cook with (albeit more fragile).

With so much paneer at hand, I was planning to make a nice Shahi Paneer for dinner. Yet again, my plans went awry, when I discovered my wonderful thick yoghurt had, in fact, passed its expiry and gone on to produce several exciting new colours while waiting to be discarded. Undaunted, I turned to that ever-ready all-purpose curry base that I'm always happy to have: korma. The fact that there were still a variety of uncooked vegetables languishing in the fridge meant that, with the addition of some ready chickpeas, I had a very easy dinner at hand in only half an hour. For the sake of variety, I added a little cashew paste to the korma sauce, and used half-and-half instead of cream.


How surprised my teenage self would have been, had I known how much I would come to love curry!

November 13, 2006

Infinite Possibilities

Of course, eggs aren't just breakfast food, or the glue that keeps your cakes and meatloaves from crumbling helplessly as you attempt to slice/eat them. Eggs have an infinite number of possibilities attached to them, whether as the star ingredient or merely an essential component. Merely, of course, practically deserves air-quotes, because there is nothing insignificant about the role of the simple egg in great baking and cooking of our time. Really, there isn't a single culinary nook they haven't invaded: they help breadcrumbs adhere to chicken, they make a dandy snack when stuffed, they are critical to hollandaise and quiche, they make muffins rise better, an egg salad sandwich is a perfect summer lunch... the list goes on.

I also like to have eggs for dinner. Sure, scrambled eggs on toast are a classic and kind of fun breakfast-for-dinner sort of thing to do, but the very best eggs-for-dinner that I know is a family of Indian dishes known as Masala Eggs. (or, Eggs Masala. Or, insert variation of your choice here.) I think of it as a family of dishes because there are literally thousands of variations to choose from - some regional, some preferential, some dictated by your darkest curry desires.

I confess that my (current) very favourite Eggs Masala actually uses the sauce from this Chicken Korma recipe (but pureed smooth with an immersion blender), but I'm happy to have just about any version, and the one shown here has the advantage of feeling very light on the palate, while still being satisfying.

Once again, I have adapted this from Quick and Easy Indian Cooking by the inimitable Madhur Jaffrey.

Hard Boiled Eggs Masala

Serves 2 for lunch, or 4 for dinner as one of several dishes

4 hard-boiled eggs
1/2 teaspoon cayenne pepper
1/2 teaspoon ground turmeric
1 teaspoon ground cumin
1 teaspoon ground coriander seed
1 teaspoon fresh lemon juice
1/2 teaspoon salt
freshly ground black pepper
1 tablespoon canola oil
1/2 teaspoon whole cumin seeds
1/2 small onion, finely chopped
1 tablespoon finely chopped fresh ginger root
1 cup of canned diced tomatoes (with some liquid)
chopped cilantro to taste

Combine ground spices with lemon juice and a tablespoon of water in a small bowl. Mix to create a thin paste.

Heat the oil in a medium-sized non-stick frying pan, over medium heat. Add the cumin seeds, give the pan a shake, then add the onion and ginger. Stir and fry until onion browns nicely. Add the spice paste, and stir and cook for another 15 seconds or so. Add the tomatoes, and bring to a simmer. Reduce the heat, cover, and simmer for about 10 minutes. Stir in the cilantro, and lay the eggs (sliced in half length-wise) onto the sauce. Spoon some of the sauce over the eggs. Serve with rice or naan, or (!) even over toast. For a thinner, smoother sauce, just add a tablespoon or two of water and puree before laying down the eggs.

June 22, 2006

Butter Chicken!

I am a sucker for Indian food (downright amazing, given my earlier fear of curry). I particularly like to experiment with hitherto unknown dishes when dining in restaurants, but for the most part my home cooking adventures in Indian cookery focus on known quantities. I like spicy food, and Indian cuisine has it in spades, but there are also more temperate dishes - full of spices and flavours, but not necessarily focused on heat.

Butter Chicken is a funny one, though. Almost every place you have it (and it seems to be available everywhere, it's that popular here), it's quite different. My local neighbourhood joint makes it mild and fragrant with coriander, and sprinkled with methi (dried fenugreek). I've had it richly tomato-y and red, mildly orange and creamy and, on myfirst attempt to make it at home, bright pink. I concluded pretty quickly that I had used too much tandoori paste on the chicken, and subsequent batches were less terrifyingly barbie-toned.

I have quite a few recipes for Butter Chicken, but most of them are eye-rollingly daunting, or involve and actual tandoor oven or other equipment that I am unable to really equal in my western kitchen. Eventually, I stumbled on the website for Mamta's Kitchen and got the bones of a workable version. My version has remained quite true to the nature of hers, but is tweaked for my own convenience. I am quite lazy, so I have no problem substituting natural cashew butter for cashews that have been soaked one hour, and then ground. Although, just for fun, I did do it that way once, my shortcut allows me to carve away a significant chunk of prep-time, which makes me that much more likely to make this on a weeknight.

June 01, 2006

Some Like It Hot! (Creamed Eggplant)

Some like it hot. Good thing, too, because sometimes, at the end of a long day when one is a little bit tired but relentlessly pushing on with the new recipe anyway, one forgets that, when halving a recipe the spices should also be halved.

Ordinarily, I probably wouldn't have even noticed that the spices were a little feisty, since I like a good bit more seasoning in my food than many folks. This, however, was an Indian recipe by way of Madhur Jaffrey, and didn't really start life as a particularly subtle dish.

As it turned out, I wouldn't make it any other way. Yes, it's a zippy little number, but that's what raita is for, yes? I did add a smidge more cream than the recipe called for, to temper the additional spice, but other than that it worked out perfectly. It was fun to make, too, with the charring of the eggplant, and the tearing away of the blackened skin in leathery chunks. In deference to my occasionally-problematic right hand, I used my mini-prep to chop the onions and garlic, and I have to say that I was impressed at what a good job it did - without producing ragged mush, as some food processors are wont to do. I would probably still hand-chop for something that wasn't going to be cooked down (such as a salsa fresca) but this worked admirably on a day when I couldn't actually hold a proper knife in my hand.

Creamed Eggplant (India)
Adapted from World of the East Vegetarian Cooking by Madhur Jaffrey

1 large eggplant
2 tablespoons canola oil
1 medium onion, chopped moderately finely
4 cloves garlic, chopped
1/4 teaspoon ground fenugreek seed
1/2 teaspoon whole fennel seed
3 tablespoons tomato sauce
1 teaspoon grated fresh ginger
1/2 teaspoon black pepper
1/2 teaspoon ground cumin
1/4 teaspoon ground cayenne pepper
pinch of salt
1/4 cup half-and-half cream
cilantro to garnish

Line a sided-pan with tin-foil, and poke the eggplant with a fork - several times on each side. Char the entire eggplant under a broiler, until the skin is completely withered and black, and the flesh is soft. Transfer the eggplant to a clean sink and strip the skin away, carefully, under running cool water so that you don't burn yourself. Chop the flesh of the eggplant roughly and set aside.

In a medium skillet, over medium heat, warm the oil. Add the fenugreek and fennel and let it become aromatic before adding the onions and garlic. Stir and fry the onions until lightly golden. Then, add the tomato sauce and the rest of the spices, and stir and fry again until mixture is a little dry. Add the chopped eggplant, ginger, and salt. Stir and fry again until everything is well integrated (about five minutes), and then add the cream. Stir the cream through, keeping on the heat just long enough to warm it all nicely. Garnish with chopped cilantro.

Serves 4 as a side-dish

Makes a surprisingly tasty appetizer when rolled up in a tortilla and sliced into pinwheels!

January 05, 2006

Grinding in the New Year

I'm a big fan of the spice rack. My particular model was built for me by my father, after listening to me complain about how I could never find one that was big enough to accommodate my frequent flyers. He built it from reclaimed marine hardwood and presented it to me a few years ago as a Christmas present. I installed it immediately, filled it up promptly, and have been using it ever since. Most of the bottles are old, but the spices, I promise (with the notable exception of the fenugreek seed, which isn't entirely... ah, okay. Except that one. And the Herbs de Provence.) are less than a year old and many of them are considerably less than that.

I use a much greater quantity of herbs and spices than my mother did, although some of that is simply because I cook from my fierier cuisines than she did, by and large. I generally prefer flavours to be full and prominent, although I do still enjoy that whispery sense of "Can you identify that?" of more subtly flavoured dishes. Using a goodly quantity of herbs makes for going through them more quickly, which makes for fresher stock all the way around. If you are lucky enough to source a shop that does high turnover in good quality spices, that's a good start. If that same store packages their own into little, convenient zip-top baggies and charges only pennies for them, you've got it made. If the mustard seeds are looking kind of faded, or the dill has lost its scent, it usually costs me a pittance to replace them.

One thing that I never really got into, despite a fascination with the spice drawer in my mother's kitchen and a predilection for mixing things together, was spice mixtures. At least, not the commercial ones. The spice mixtures available when I was a kid were usually "Italian Seasoning" (much of which would be salt) and similar convenience packaged things for people who didn't want to measure from more than one bottle, or don't know what sort of herbs were complimentary with each other. I disliked them for the perceived laziness, but also for the lack of control over the quantity of each herb or spice in the blend. Chili powder evaded my distain solely because I was too ignorant to know that it was actually a blend, and not just straight powdered chile.

I still use chili powder, because I found one that I like. I also use a Herbs de Provence mixture, pretty much because we bought it in Provence, which means that it's the oldest thing on my rack. Clearly, I need a trip to France again, and soon! I've unbent on the pre-made mixtures enough to appreciate ones that are well made, but I tend to make my own spice blends. I have a blend for Cajun, one for South West flavours, and perhaps the best one of all, garam masala.

I was disenchanted with commercially purchased garam masala, and intrigued by the recipe that I found in Seductions of Rice by Alford & Duguid. I promptly scaled the recipe down and gave it a cautious try - to my absolute delight. The house was so thoroughly perfumed with Indian spices that eating anything else for dinner was unthinkable. When I recently made a fresh batch - same thing. Even just thinking about it makes me hungry.

There are a lot of variations out there on garam masala - some include chiles, or fennel seeds, or other ingredients. The great thing is, you can play with the mixture until you get one you like. I think this one is terrific as is - it's certainly a great starting point.

Garam Masala

Adapted from Seductions of Rice

1/4 cup black peppercorns
1/4 cup whole coriander seed
1/4 cup whole cumin seeds
1 tablespoon whole cloves
1 teaspoon cardamom seeds from the inside of green cardamom pods
1 inch of cinnamon stick, broken

Place a medium skillet over a medium flame and add all of the spices. Dry roast them until fragrant, stirring constantly, and continue to roast for another minute or two after the scent becomes strong. Remove from heat and pour into a bowl to cool for a couple of minutes before grinding.

Place the slightly cooled spices into a spice grinder and grind until a fine, uniform powder is achieved. Allow powder to finish cooling, and then store as you would any ground spice - in a jar or sealed bag, preferably away from light.

This makes just exactly the amount of garam masala for me to fit the whole spices into my grinder all at once. The ground yield is about 3/4 cup.

Have a snack on hand - this will make you hungry.

December 18, 2005

From My Rasoi - Bengali Dal


For my 101st post, I am posting my entry to Meena's "From My Rasoi - Winter" blogging event. I've chosen an original recipe that I call Bengali Dal (even though it is not made with Bengal gram), which is the perfect kind of warming, comforting food to have during the long, comforting food to have during the long, chilly months of winter.

The red lentils don't take long to cook, and the warmth of the mustard seed oil combined with the creaminess of a small amount of coconut milk makes this a wonderful counterpoint to the flavours of cumin, chiles, garlic and curry. The little dark specks are brown mustard seed and nigella seed, the red is finely diced tomato, and the green is sliced chiles. You can vary the amount of chiles to make it as spicy or mild as you like, but naturally I like it spicy. There is a little dried fenugreek stirred into the dish at the last minute, which makes a sudden, compelling fragrance that will pull people into the kitchen.

Bengali Dal

Serves 6 - 8
Total prep and cooking time: 40 minutes unless you're super-efficient and/or have kitchen helpers. Then, maybe 25 - 30.

1 1/2 cups of red lentils (masur dal)
4 1/2 cups of water
3/4 teaspoon turmeric powder
1/2 teaspoon ground cumin
1/2 teaspoon curry powder (optional)
1 1/2 teaspoons sambal oelek
1 clove garlic, minced
2–3 jalapeños, seeded and chopped
1 small can coconut milk - 2/3 cup, approx.
1 teaspoon salt

Tempering:
1 teaspoon mustard oil
1 teaspoon nigella seed (kalonji)
1 teaspoon brown/black mustard seeds
1 medium onion, diced medium
1 clove garlic, sliced
1 large tomato, seeded and diced

Finishing:
salt to taste
big pinch of fenugreek leaves

Pick over lentils to remove misshapen, discoloured or otherwise irregular lentils and any foreign matter (little rocks, plant stems, etc). Rinse thoroughly, with several changes of water to remove any grit or dust (very important).

Place lentils in a heavy pot with the water and the turmeric and bring to a boil. Reduce the heat to a medium-low simmer, and skim the yellow foam from the top. Allow to simmer until lentils are tender and starting to fall apart – 15 minutes or a bit more, if you have older lentils. Add the jalapeños, crushed garlic, spices and the coconut milk and continue to simmer (with the lid off, stirring occasionally) and get thick while you prepare the tempering.

In a small, nonstick skillet, heat oil gently over medium heat. Add nigella seed and mustard seed, giving the pan a shake to distribute. As soon as the mustard seeds start to pop, add the onions and sliced garlic and fry gently until they have softened. Next, add the diced tomatoes, and stir until they give up their liquid - often they turn the onions a pretty golden colour - and scrape the mixture into the lentil pottage. Use a spatula to get out all the spicy goodness! Taste and adjust for salt to your preference and stir in the fenugreek leaves just before serving.


I am happy to serve this over rice as a meal unto itself, or as part of a larger menu. It freezes and reheats extraordinarily well, which makes it the perfect thing to make lots of, and tuck away the leftovers in the fridge for one of those harrowing days when you need a little home made comfort, but haven't the energy or nerves to do more than heat something up. It also travels well to work or school and is vegan, although I am not.

December 06, 2005

Don't Let Anyone Tell You...

Don't let anyone tell you that you can't make quesadillas out of leftover aloo gobi. Because you totally can.

I used to make pizza out of anything leftover. My mother used to conceal leftovers in scrambled eggs. Now, I make quesadillas. A little cheese to act as culinary glue, a little Sriracha sauce, and dinner was good to go!

June 30, 2005

Spinach & Chicken Curry

Fortnightly update!

The main Always in the Kitchen website has a new recipe:

Spinach & Chicken Curry - a variation on Saag Paneer. Vegetarians can simply leave out the chicken (increase the paneer, if you want it as a main dish).

and a new essay:

Ecumenical Eating

"...My classmates thought that, because they were eating, they were getting away with not studying, even though a highly specific vocabulary lesson was being delivered. Me, I was happy to have bread, cheese, and crisp green pears, and speculate about what it would be like, to live in Paris – where, no doubt, I would be popular, and stylish, and understood."

Enjoy!