Showing posts with label Make It Forever!. Show all posts

April 20, 2020

Pannkakor: Swedish Pancakes


Pannkakor are less of a breakfast food in Sweden and more often served as lunch/dinner, supper, or dessert. Most famously, pannkakor are served on Thursdays after a bowl of yellow pea soup (with or without ham, drizzled with mustard). They appear on school lunch trays, on hospital menus, and in heat-and-serve portions at the supermarket (complete with lingon berry preserves).

The number of pancakes you get will be determined partly by the size of the pan you use, and partly by the size of the eggs in your batter, partly how much batter you pour.

Klassiska Svenska Pannkakor
Classic Swedish Pancakes

(Translated and adapted from Pannkakor.se)

Makes approximately 11-12 thin pancakes, if using a 28 cm skillet

250 ml (1 cup) all purpose flour
1/2 teaspoon coarse salt
600 ml milk
3 large eggs
3 tablespoons butter, divided

In a large mixing bowl, preferably one with a spout for pouring, mix the flour and salt. Add 250 ml of the milk, and whisk until the batter is smooth. Add the remaining 350 ml of milk and whisk to combine. Add all three eggs, and whisk again until completely smooth and integrated, with no streaks of yolk in the batter.

Let the batter rest at room temperature for 30 minutes. Close to the end of this time, preheat a 28cm non-stick skillet (or well-seasoned cast iron, if you have wrists of steel) over medium heat. At the same time, set your oven to warm and place a large "resting plate" on the middle or lower middle rack, so it will be ready to receive the pancakes as they come off the pan.

Melt the butter in a small bowl. add 22.5 mL (1.5 tablespoons) of melted butter to the pancake batter, and whisk through. The rest of the melted butter will be used to fry the pancakes, a little at a time between each pancake.

When the skillet is hot, just before you pour your first pancake, use a pastry brush to brush a little butter over the cooing surface of the hot pan. I measure my batter by pouring it into an actual measuring cup first, so that my pancakes are consistently sized If you have a ladle that is the right size, that will work well too. Pour 80 ml (1/3 cup dry measure cup) of batter into the buttered pan, and quickly lift and tilt the skillet so that the batter covers the bottom of the skillet in a thin layer, trying not to go up the sides of the pan.

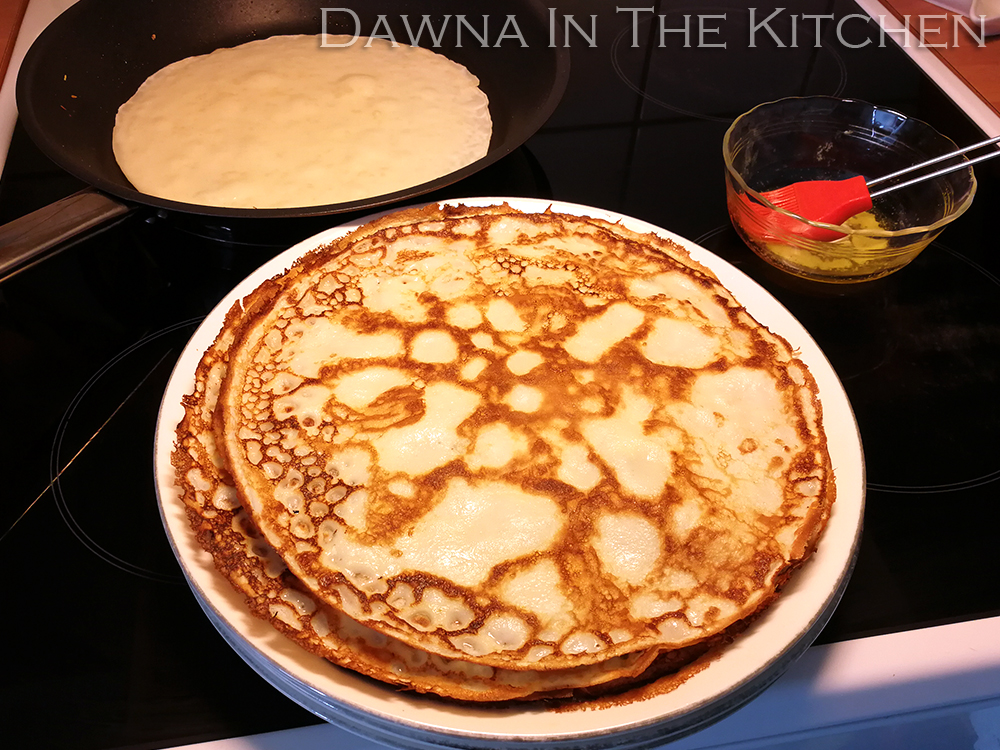
Let the pancake cook for about 2 minutes - if you try to flip it too soon, it will tear, so be patient. If you are concerned that it is cooking too quickly, reduce the heat instead of reducing the cooking time. When the two minutes are up, slide a spatula carefully under and around the edge of the pancake, and then slide it beneath to quickly lift and turn the pancake. This may take a bit of practise to get a smooth action, but you have a lot of batter with which to practise. The cooked side of the pancake should look a bit lacy and browned in spots, like in the picture above.

Let the pancake cook on the second side for about 30 seconds, or until set, and then slide it onto the resting plate in the oven.

Put the skillet on a unheated burner. Brush with melted butter, add the next portion of batter and tilt to spread the batter, and immediately return the skillet to the hot burner (medium heat). This helps keep the skillet from overheating, and prevents the butter (and the next pancake) from burning. Continue as before, stacking up the pancakes until all the batter is used. You may need to gradually reduce the heat under the burner as you work your way through the batter, so if the pancakes are getting too dark, or dark too quickly, reduce the heat a little as you go.

If there is any melted buter left over at this point, it can be brushed over the top pancake(s) for a little extra luxury.

Pancakes are traditionally served with lingon berry preserves, or fresh berries and whipped cream, but you can also use syrup (maple, birch, any fruit syrup, chocolate) or, of course, any other fillings you choose.


Swedish proverbs featuring pancakes

Man matar inte grisar med pannkakor.
➔ One doesn't feed pigs with pancakes.

Man är aldrig säker förrän hon ligger i magen, sa pojken som tappade pannkakan i askan.
➔ You're never certain until it's in your belly, said the boy who dropped the pancake in the ashes.

Upp som en sol och ner som en pannkaka.
➔ Up like a sun, and down like a pancake.

April 14, 2020

Tomato, Coconut & Red Lentil Soup


I am a huge fan of soup, as you can probably tell from my collection of soup recipes. Tomato soup has always had a particularly special place in my heart, dating from some of my earliest memories of coming inside for lunch and having a steaming bowl of tomato soup with a toasted cheese sandwich. That combination is still one of my absolute comfort foods.

Much as I continue love classic tomato soup, sometimes I want something a little different. This was the genesis of my popular Fiesta Tomato Soup, which is chock full of veggies and rice, but this time I was craving something both heartier and a little richer. Since I'm a big fan of South Asian flavours, I reached into the cupboard and came up with coconut milk, red lentils, and a spice combination that I felt went with them. This is an absolute new favourite, and another fine reason to always keep coconut milk in the pantry. Remember to remove the bay leaf before blending (cough cough).

Tomato, Coconut, & Red Lentil Soup

Serves 4
Total time, prep & cooking: 1 hour

1 tablespoon canola oil
1 bay leaf
1 small yellow or red onion, finely chopped
3 cloves garlic, minced or pressed
30 mL (2 tablespoons) tomato paste
1/2 teaspoon ground cumin
1/2 teaspoon ground coriander seed
1/2 teaspoon hot or mild curry powder
1/4 teaspoon ground cardamom
1/4 teaspoon ground ginger
1/4 teaspoon ground mustard seed
1/4 teaspoon ground white pepper
1 400 gram tin crushed or diced tomatoes
60 mL (1/4 cup) dried red lentils (whole or split), washed thoroughly (no need to soak)
250 mL coconut milk
400 mL water or vegetable broth/stock

In a medium soup pot (I use a 2 litre pot), heat the oil and bayleaf over medium heat while you chop the onion and garlic. Add the onion and garlic to the pot and stir about, and let it gently fry until the onions are tender. While the onions are frying, open the tin of crushed tomatoes (do not drain them), open the container of coconut milk and stir if necessary), rinse and drain the red lentils, and measure the water/broth. Measure your spices into a small bowl or plate.

Give the onions a stir, and add the tomato paste. If it starts to really stick and you're worried about burning, add a few tablespoons of water. Stir the tomato paste through, and then add the spices and stir through again. Let the mixture cook, stirring frequently for a couple of minutes or until fragrant and integrated.

Add the tin of crushed tomatoes, the rinsed and drained lentils, the coconut milk, and the water/broth. If you are using water instead of broth, and especially if the tomatoes are not salted, you may wish to add a big pinch of salt at this point, too (about a quarter teaspoon). Give the whole pot a nice stir through, scraping the bottom of the pot to make sure nothing is stuck, and bring the mixture up to a gentle boil. Reduce the heat to low, cover, and simmer for 40 minutes.

Take the pot from the heat and remove bayleaf. Use an immersion blender (or a regular blender, but in stages so the blender is never too full of hot liquid) to thoroughly blend everything into a smooth soup. Serve at once, or cool and store for up to three days in the fridge or, once cooled up to three months in a sealed container in the freezer.

If you want a garnish, a few drops of coconut milk from the bottom of the container swirled through, with or without a sprinkle of garam masala, is a nice touch. Serve with bread (naan would be especially good) or idli.


April 05, 2020

Swedish Hash: Pytt i Panna


Pytt i Panna (AKA Pyttipanna), which translates somewhat literally as "small bits in a pan" is the Swedish version of hash. This is a classic Husmanskost (homestyle cooking) dish, and it is also classic pub food here in Sweden. Swedes don't eat it for breakfast, though - it's a lunch or casual supper in these parts. While it is very easy to make at home, it's made even easier by the vast array of frozen options that you can simply empty into a pan and stick in the oven until it's done (fried egg managed separately, of course). The most common types of pytt I see in the supermarket are Korv (sausage), Ox (roast beef), Bacon, Skinka (ham), Krogar (pub style, usually a mixture of bacon, sausage, and ham), Kyckling (chicken) and vegetarian (mushroom, peppers, and/or zucchini). When served as a supper, it is generally accompanied by diced or sliced pickled beets and/or fermented cucumber pickles on the side.

I've decided to go with Korv for my first from-scratch attempt, and found the whole process very straight-forward with delightful results. I'm using Swedish Falukorv, for which you can substitue by using bologna sausage, German Fleischwurst (or Fleischkäse, for that matter), Lyoner sausage, or even European (Frankfurter) wieners and get a very similar effect. In practice, of course, you can use any sausage you like, including vegetarian or vegan options, or indeed, any of the items listed above.

Pytt i Panna

Serves 2

1 tablespoon canola oil
80 grams yellow onion
150 grams Falukorv (or other sausage, see above)
500 grams waxy potatoes
1/8 teaspoon coarse salt
1/4 teaspoon ground white pepper

Start by warming a large skillet on low heat while you chop vegetables. Also preheat the oven to 200°C/400°F with a rack in the upper middle slot.

Peel and finely dice the onion. Part of the goal is to have all of the pieces approximately the same size, so keep that in mind when you are dicing. The onions will shrink a bit as they cook, but that's fine.

Remove casing (if any) from the Falukorv, and finely dice the meat, keeping in mind that the pieces should be roughly the same size. Go smaller than you think, because what looks small on the cutting board suddenly seems much larger in the skillet.

Add the oil to the pan and turn up the heat to medium. When the oil is hot, add the diced onions and sausage to the skillet, and spread them out a bit. While they sizzle and start to cook, prepare the potatoes. You can stir the onions and sausage a few times while you're chopping potatoes.

Peel the potatoes (or not - you can just wash them if you prefer) and remove any ugly bits. Chop into fine dice (I like to slice each potato into vertical slices, then make piles of the slices to slice again into baton shapes, and then turn to slice into dice, but you can use whatever method you like). It is especially important to keep the pieces small, so that they cook quickly, and so they match (roughly) the size of the sauasge pieces. We're talking smaller than a standard sugar cube, for scale. Perfect dice is not required, but making an attempt at general uniformity makes a more attractive dish. Just think of it as an excuse to practise your knife skills.

One the potatoes are diced, add them to the skillet andd give everything a thorough stir-through. Sprinkle with salt and white pepper (go easy on the salt if you are using a salty meat), and stir through again. Cook, stirring occasionlly for about 10 minutes, and then place the skillet in oven, uncovered, and leave it for 10 minutes. You do not need to use the oven, though. You can also continue to cook on the stovetop, stirring occasionally, for another 10-15 minutes as needed. Test one of the larger potato pieces to be sure it has cooked through, before serving.


While the pytt finishes cooking in the oven, you can use the time to tidy up and lay out any sides (such as pickled beets or cucumbers), and also to fry an egg for each portion. Sunny-side-up is pretty, but poached is another good option. In fact, you can do the eggs any way you like best.

Spoon the pytt from the skillet onto the serving dishes, top with the eggs, and add any pickles you might like. Some folks put a little parsley on top, too, but I don't bother. Boom! Beautiful breakfast, brunch, or dinner.


Freezer: You can make your own Freezer Treasure version, by spreading the diced, uncooked cubes out on a sheet, freezing until firm, and then bagging. You can cook this entirely in the oven, stirring a few times, for about 40 minutes instead of the stovetop method.


February 24, 2020

Silky Butternut Squash Soup


I love soup. This is an easy-to-make, one-pot, puréed vegetable soup that is so satisfying, you'll look forward to the next bowl even while you're finishing the first one.

The curry powder is optional, but does not give a pronounced flavour and complements the soup very nicely. You could substitue a Thai red curry paste, if you wish, for a different character.

If you don't want any potato in the soup (for whatever reason), you can simply use more squash instead. I note that the potato does contribute to the silky texture of the soup.

The croutons made from a toasted cheese sandwich are of course also optional, but such a good idea!

Note about butternut squash: butternut squash has an enzyme just beneath its skin that has a peculiar effect on the skin of your hands when you handle it, leaving your hands feeling very tight and dry afterward. This feeling is not solved by simply washing and moisturizing; to avoid this unpleasantness, I recommend that you wear rubber gloves (such as for washing dishes) while you peel. I use a sturdy Y-peeler, which has no difficulty tearing through the tough skin.

Butternut Squash Soup

Serves 4

15 mL (1 tablespoon) canola oil
1 small onion, chopped (about a cup/250 mL)
2 cloves of garlic, peeled and chopped
2 small dried bay leaves (or 1 large)
1/4 teaspoon ground white pepper
1/2 teaspoon dried thyme leaves, or two sprigs of fresh thyme
1/4 teaspoon curry powder (optional)
500 grams peeled butternut squash, diced
150 grams waxy potato, peeled and diced
750 mL (3 cups) vegetable broth/stock or water
250 mL (1 cup) coconut milk
salt if needed (1/2 teaspoon coarse salt if using water)

Start by peeling and chopping the onion, garlic, butternut squash, and potato. You don't need to worry much about the size of the chopped vegetables, because it will all be pureed in the end. Prepare the broth - I used a bouillon concentrate - (or measure out the water), and open/measure out the coconut milk.

In a good-sized soup pot (a 2 litre pot works great), heat the canola oil over medium heat. Add the onions and garlic, and stir. Cook the onions and garlic for about three minutes, stirring occasionally, or until the onions are tender and translucent. If they start to turn brown, lower the heat slightly. Add the bay leaves, white pepper, thyme, and curry powder, and stir through. If you are using water instead of stock or broth, add the salt now. Add the chopped butternut squash and potato, and stir around to coat them with the seasoned onion mixture. Add the coconut milk right away, and stir again. Add the vegetable broth (or water), and stir through to make sure nothing is stuck to the bottom of the pot. Everything should now be in the pot.

Turn up the heat and bring the proto-soup to an almost-boil, and then reduce the heat and cook at a gentle simmer (with the lid off) for 40 minutes, stirring occasionally to make sure nothing gets stuck to the bottom. Adjust the heat as you go, if necessary, to keep the liquid bubbling gently. Test the potato and the squash to make sure they are soft. Remove the soup pot from the heat.

Use a ladle to remove at least half of the liquid (no chunks!) to a separate bowl, and reserve. Remove the bay leaves from the pot entirely, and discard - their work is done. There should be just enough liquid left in the pot with the vegetables to help purée everything to luscious smoothness. You can use an immersion blender right in the pot itself, or you can transfer the vegetables and remaining liquid to a blender or food processor. Blend/process until very smooth. Return to the pot (if necessary), and add back in the reserved liquid, stirring to integrate. Taste the soup, and add salt if needed. If the puréeing process has cooled the soup down too much, return the pot to a medium-hot burner, and reheat gently until ready. This would be an excellent time to toast some sandwiches or cut some slices of crusty bread.

Serve immediately, or remove from the heat and allow to cool, before storing in the fridge for up to 2 days, or freeze in an appropriatee container for up to 2 months.

March 26, 2019

Wagon Wheel Skillet Dinner


I love skillet dinners. They are a terrific way to get a home-cooked meal on the table with minimal cleaning up required, tend to be quick and easy to make, and are always well received. This Wagon Wheel Skillet Dinner hits all three of those points with ease. Of course, you can also use any other short pasta shape, but these rotelle seemed perfect to the southwest theme. If you like a saucier texture, more like a chili mac, feel free to double the salsa, or add a cup of crushed tomatoes.

This recipe relies heavily on the fresh chorizo for its seasoning, but you can always add additional cumin, chipotle, ancho, and Mexican oregano if your sausage is very mild.

Wagon Wheel Skillet Dinner

Serves 4

300 grams fresh Mexican-style chorizo
200 grams short pasta, such as rotelle/wagon wheel shape
2 cloves garlic
2 jalapeño peppers
1/2 teaspoon ground cumin
250 mL frozen corn kernels/niblets (about a cup)
250 mL prepared tomato-based salsa, heat level of your choice
3 tablespoons tomato paste
500 mL water or chicken broth/stock, plus extra water if needed
225 grams cooked black beans (eg. a 400 gram can, drained)
1 red bell pepper
Tabasco pepper sauce to taste
Shredded cheese of your choice, to finish
Cilantro and/or avocado to garnish, if you like

Set a large skillet to warm on the lowest burner setting while you prepare the ingredients. Remove the chorizo from its casing and chop roughly. Mince or crush the garlic and set aside. Remove seeds from jalapeños and finely chop. Measure the cumin. Measure out the corn and the salsa. Drain the black beans in a sieve, and rinse them well if using canned ones. Measure the tomato paste. It's a time-saver to heat the stock or water, but not essential.

Turn up the heat under the skillet, and let it come up to medium-high. Add the chopped, skinless chorizo, and fry it in its own fat, stirring periodically, until the meat starts to turn golden brown (about six to eight minutes). Add the minced/crushed garlic and stir through. Add the jalapeños and the cumin and stir through. Cook and stir for about a minute, and then add the frozen corn kernels, and stir them through, too. Give them about a minute on their own, and then add the prepared salsa and the tomato paste, and stir through. You can immediately add the pasta and the broth or water, and stir everything carefully together.

Bring the mixture up to almost boiling, then cover the pan and turn the heat to medium-low. Cook for about 10 - 15 minutes, stirring periodically, until the pasta is tender. The length of time is really going to depend on which pasta you are using, so test the pasta as needed. While the pasta cooks, dice the red bell pepper and grate the cheese.

When the pasta is almost tender, add the drained black beans and the diced bell pepper, and stir through. Bring the temperature back up to a simmer, and if it is looking too dry (it should be just slightly saucy) add extra water - maybe half a cup or so, as needed, to get a pleasingly consistency. Reduce the heat again, and simmer for another five minutes to heat the peppers and beans through. Remove the lid and sprinkle Tabasco sauce over the skillet, and then gently stir it through. Turn the burner off. Taste the pasta to confirm that it is cooked through, and if necessary add 1/4 teaspoon salt (probably not necessary if you have used broth - it depends on the existing saltiness of the chorizo, the beans, and the salsa).


Sprinkle with cheese and cover briefly cover again to let the cheese melt. Serve with cilantro if you like (we were out, and so we served it with diced avocado to squeeze in an extra vegetable.


This dish heats up very well in the microwave (add a bit of extra cheese if you're feeling frisky) and so makes an excellent lunch.

September 16, 2018

Hummus Kawarma: Hummus with spiced lamb


Think of Hummus Kawarma as the Middle Eastern answer to Tex Mex's Five Layer Dip: the base is creamy hummus, the next layer is fried spiced lamb, further toppings are whole chickpeas, toasted pine nuts, and lemon parsley sauce. (Oh, did you want seven layer dip? Perhaps you could add finely diced cucumber and tomato, although I prefer those on the side as part of a classic Israeli salad.) What about the tortilla chips, you might ask. Well, oven-toasted pita chips make the perfect stand-in, but you could also simply use fresh pita bread cut or torn into pieces as needed. You can serve this as an appetizer or main course, as a communal shared plate or as individual servings.

The recipe for the spiced lamb topping and the lemon sauce is from the Jerusalem cookbook by Ottolenghi and Tamimi, and is also available on the Ottolenghi website, although I note that I used ground lamb instead of hand-chopped lamb neck.

So, what am I bringing to you here, since the exciting part of the recipe is elsewhere? Well, aside from cheap analogies to Tex-Mex cuisine, you also get my formula for extremely creamy hummus using an immersion blender. You'll need a kitchen scale to get the exact ratio, but if you don't have one you can still get by.

Immersion Blender Hummus

Makes 400 grams

Serves 4 as part of the above recipe (as a main course)

400 gram (14 oz) can of chickpeas, drained, reserving liquid (about 265 grams /9.3 oz cooked chickpeas))
45 ml (3 tablespoons) tahini (stirred well)
2.5 ml (1/2 teaspoon) salt
Juice of half a lemon
1 clove garlic, chopped or pressed
1 tablespoon olive oil
Chickpea cooking liquid OR water to make the total weight of all ingredients 400 grams (14 oz). If you don't have a kitchen scale, start with 60 ml (1/4 cup) liquid and add more as needed. You probably won't need more than 125 ml (half a cup).

You can put all of this into the blender cup and blend until smooth, but I find it's easier on the machine if you first make a puree of everything except the chickpeas and extra liquid. Then add the chickpeas, about a quarter of them at a time, blending until smooth between each addition, and finally adding the extra liquid until you achieve a smooth, creamy texture. Devour immediately, or transfer to a sealable refrigerator container. It keeps nicely for at least three days...I've never had it last longer, so after that you're on your own.

If you're completely obsessed with ultra smooth texture, take the time to pinch each chickpea to remove the skin. It takes a while but it's worth it, although I note that this step lowers the insoluble fibre content somewhat.

August 26, 2018

Phad Kaphrao: Thai Holy Basil Stir fry


Until really recently, I thought that Thai Holy Basil was the same as the ubiquitous "Thai basil" which one receives in so many Southeast Asian dishes in Vancouver. However, they are indeed quite different. I was buying ingredients for summer rolls from my local Asian grocer, and grabbed a packet labeled Holy Basil without really looking at the leaves. Unsurprisingly, given that the owners of the shop are Thai, it turned out to be the real deal Holy Basil, and that was not what I had been looking for at all. Undaunted, I went online to learn a bit about the plant and how it differs from the Thai basil I was familiar with (which turns out to be a varietal of cinnamon basil).

This is the dish that I decided to make, once I understood what I had got my hands on: Thai Holy Basil & Pork Stir-fry, very lightly adapted from Woks of Life.

Holy Basil Stir fry (ผัดกะเพรา) is a popular dish across Thailand, and can be made with the protein of your choice. Recipes for chicken or pork abound, but I've also seen them for beef and for tofu, so I guess it's really up to you. Serve it over fragrant rice, maybe with a fried egg for the most common traditional presentation.

It is quick, it is easy (provided you can source the Holy Basil of course), and most importantly, it is delicious!

Phad Kaphrao Moo Sab: Holy Basil Stir Fry with Pork
ผัดกระเพราหมูสับ

Serves 4

2 tablespoons canola oil
1 small yellow onion
7 cloves garlic
5 Thai bird chiles, or equivalent hot red chilies
500 grams ground pork
1 teaspoon sugar
1 tablespoon fish sauce
1 tablespoon less-sodium soy sauce
2 teaspoons dark soy sauce
2 teaspoons mushroom sauce (or oyster sauce)
⅓ cup chicken broth or water
1 bunch Holy Basil leaves (about 1 1/2 cups packed)

This dish comes together fast, so do all of your prep in advance. This is no time for chop-and-drop. Start by preparing the rice, which takes the longest to cook. While the rice cooks, you can prepare the rest of the ingredients, and when there is only about 15 minutes left for the rice, start cooking the stir fry.

Preheat a large skillet over the lowest heat setting.

Slice the onion (pole-to-pole) into moderately thin strips. Slice the garlic thinly. Slice the red chiles finely, first removing seeds if necessary. You can measure the sugar, fish sauce (I use one with added chiles), soy sauce, dark soy sauce, and mushroom (or oyster) sauce into the same prep bowl. Efficient! Measure out the water/broth. Strip the Holy Basil from its stems, but do not chop the leaves, not even the big ones.

Turn up the heat under the large skillet to medium, and give it a few seconds to come up to temperature. Add the canola oil and the sliced onion, garlic, and red chiles, and stir and fry them until the onion starts to turn translucent, about three to five minutes. Add the pork (I used a pork/beef blend, which is common in these parts), and break it up with your spatula/wooden spoon. Stir and fry the meat for a few minutes, but don't stir it quite constantly, so that the meat picks up a bit of golden colour from contact with the hot pan. This will take up to about five minutes, maybe a few minutes more depending how hot "medium" is on your stove. Once the meat has been lightly browned and there are no longer any pink showing, add the sauce mixture and the chicken broth (or water) and stir through. Continue to stir and fry until the liquid is evaporated/absorbed by the meat, and then add all of the Holy Basil leaves at once to the skillet.


Give them a moment to wilt, then stir them through. Stir and fry for about 30 seconds, and then serve with the hot fragrant rice (and a fried egg, if you've planned ahead that far).

June 27, 2018

Chicken-Bacon-Jalapeño Popper Pasta


Whew, that's a mouthful! Really, it's just an extra fancy macaroni and cheese, because adding chicken, bacon, and peppers to tasty basic recipes is almost always a good idea. Best of all, the leftovers heat up beautifully for an indulgent lunch.

This recipe doesn't use actual jalapeño poppers, but it does use all the ingredients for them. Much easier than deep frying though! You can use any small pasta shape - elbow macaroni, mini bow-ties, mini penne (pictured), or small shells, but don't use the really tiny ones, such as stars or alphabets, as they need to be able to stand up to the chicken chunks.

Chicken-Bacon-Jalapeño Popper Pasta

Serves 4

15 grams (1 tablespoon) butter
300 grams (10 oz) chicken breast, cubed in bite-sized pieces
125 grams bacon lardons
1 small onion, finely chopped (about 1 cup)
2 cloves garlic, pressed
2-3 fresh jalapeño peppers, seeded and minced
1/2 teaspoon kosher or other coarse salt
200 grams (.75 cup) evaporated milk, divided
500 mL (2 cups) water (preferably, recently boiled and still hot)
200 grams (1.5 cups) elbow macaroni (or similarly small pasta shape)
1/2 teaspoon cornstarch
3 shakes of Tabasco sauce
200 grams (1.5 cups) grated sharp Cheddar cheese, divided
100 grams spreadable cream cheese
6-10 pickled jalapeño pepper rings, roughly chopped
6 buttery crackers, such as Ritz or Club crackers, crushed into crumbs

Preheat the oven to 180°C/350°F with a rack in the middle. Lightly butter, oil, or grease a 2 litre (2 quart/11x7") casserole dish and put to one side.

Heat a large saucepan over medium heat. Melt the butter, and add the cubed chicken breast. Give it a couple of stirs to lightly brown the outsides, and then remove the chicken pieces to a clean plate to stand by (the chicken won't be cooked through, but it will finish cooking in the oven). Without cleaning the saucepan, add the bacon lardons (this is just short, chunky pieces of bacon - feel free to chop up some thick-cut if you can't find lardons or slab bacon to make lardons from). Let the bacon sizzle and stir it about a for a couple of minutes until it renders about half of its fat, and then use a slotted spoon to remove them from the pan (you can add them to the chicken plate).

Next, add the finely chopped onion and the garlic, and sauté until the onion turns translucent. You'll want to keep stirring so the onion bits don't stick to the fond left behind by the chicken and bacon, and turn the heat down if the edges start browning. Add the minced fresh jalapeños, and stir them for about 30 seconds. Leaving the onion, garlic, and peppers in the pot, add the water and 125 mL (1/2 cup) of the evaporated milk and bring to a boil (you can turn up the heat to medium high, once the liquid has been added). Add the salt and the macaroni, and cook (stirring frequently) until the macaroni is tender and the liquid is reduced to a small amount burbling up between the pieces of pasta. This should only take about 7 or 8 minutes.

Put the remaining 60 mL (1/4 cup) of evaporated milk in a small bowl with the Tabasco and the cornstarch. Stir until smooth. Add to the cooked macaroni and stir until the sauce begins to thicken – no more than a minute or two over high heat. Turn off the heat and add the 1 cup of the cheddar cheese, one handful at a time, stirring it in each time, and adding a tablespoon or two of room-temperature water if it gets too thick to comfortably stir. Once the cup of cheese has all been added, stir in the cream cheese and stir until it melts smoothly into the sauce.

Add the chicken and bacon back into the pasta pot, including any juices that might have pooled in the bottom of the plate. Add the minced pickled jalapeños now, and stir them in, too. Scrape the pasta mixture into the prepared casserole dish, and cover with the remaining cheddar cheese and then top with the crushed cracker crumbs.

Place in the oven, uncovered, and bake for 20 minutes. Let stand for 5 minutes before serving.


June 10, 2018

Coconut Lime Chicken & Rice Skillet


I developed this recipe because I had a lot of jalapeños to use up, and because I love skillet dinners. It's not quite Caribbean, not quite Mexican, and not quite South East Asian, but it's extremely tasty and a very satisfying meal that takes just over an hour to get on the table - half of that time unattended.

We served this with a salsa fresca (pico de gallo) on the side, but any nice fresh salad would also do the trick. I'm pleased to report that the leftovers, if you're that lucky, also make an excellent filling for wraps - with or without the rice.

Coconut Lime Chicken & Rice Skillet

Serves 3-4

6-8 bone-in chicken parts, with skin
2 tablespoons coarse salt
zest of 1 lime
juice of 1 lime, about 2 tablespoons
200 grams (1 cup, 7.05 oz) uncooked parboiled rice
165 mL (2/3 cup, 5.5 oz) canned coconut milk
4 large jalapeños
1 small onion
2-3 tablespoons shredded fine unsweetened coconut
2 cloves garlic
375 mL (1 3/4 cup, 12.5 oz) boiling water
1 small bunch cilantro, stems removed, chopped roughly (a generous handful)

Preheat the oven to 200 C/400 F.

Remove any excess skin and/or fat from the chicken with a sharp knife. Combine the lime zest with the coarse salt in order to make a seasoned rub. Massage the seasoned salt into the chicken on all sides, discarding the excess salt that falls off in the process. The tops of the chicken pieces should have a sparse but even coating of salt.

In a large (30cm/12") skillet or braising dish, lay the chicken pieces in a single layer, skin-side up. Place the dish in the oven and bake, uncovered, for 30 minutes, during which time you can prepare the other ingredients.

Finely dice the onion, and mince or press the garlic. De-seed the jalapeños, and finely dice one of them. Cut the remaining three jalapeños into rings and set aside until the final stages. Squeeze the juice from the lime. Rinse the rice under cool water until it runs clear.

After the chicken has cooked for 30 minutes, remove it from the oven, and place the skillet on a moderately hot burner. Use tongs or a spatula to transfer the chicken pieces to a clean plate. Into the juices left behind in the emptied skillet, add the onion, garlic, and finely diced jalapeño. Sauté for about two minutes, until the onion softens and turns translucent. Add the rice, and stir it around to coat the grains in the onion and chicken fat mixture. Turn the burner off. Add the lime juice and stir through. Add the coconut and the coconut milk and stir through. Add the boiling water (carefully), and stir though, using a spatula to smooth the rice into an even layer beneath the liquid.

Use tongs or a spatula to transfer the chicken pieces back to the skillet, arranging the pieces in a single layer on top of the rice. The tops of the chicken pieces should not be covered by the cooking liquid, but the sides may be a little until the rice starts absorbing the liquid.

Place the full pan back in the oven, uncovered, on the middle or upper middle rack, and bake for another 30 minutes. You may wish to check it after 20-25 minutes, to make sure it's not drying out, but unless your oven is hot, it should be fine.

Remove the skillet from the oven, and scatter sliced jalapeños and cilantro over top if you're serving the whole dish at the table.

Distribute the chicken to the individual diner's plates, and stir the jalapeños and cilantro through the rice. before serving the rice.


If you would like to make this dish entirely stovetop, that's also manageable, but requires a bit more hands-on labour (and the skin won't be crispy): Sear the seasoned chicken breast on both sides, cooking for a total of about 10 minutes, and set aside. Proceed as above, but reduce the boiling water to 295 mL (10 oz) and instead of placing the assembled dish in the oven, bring the liquid to a gentle simmer on the stovetop and turn the burner to its lowest setting. Cover the pan with a tight-fitting lid, and cook for 15 minutes. Turn the heat off and move the skillet to a cool burner or heatproof pad and let sit undisturbed without ever lifting its lid for another 15 minutes. Serve as above, adding the sliced pepper rings and the cilantro and stirring it through the rice.

December 10, 2017

Potato Stroganoff Skillet Dinner


Stroganoff doesn't have to be served with noodles! This quick weeknight-friendly recipe uses quartered nugget potatoes for maximum speed and a rustic, chunky, satisfying dinner. If you'd rather slice your potatoes into thin rounds to mimic the packaged version, go for it, but it will take a little longer in prep time.

This recipe was developed as a hybrid between my Hamburger Stroganoff Skillet Dinner and my Bauerntopf mit Hackfleisch (Farmer's Skillet Dinner), and it is a saucy, creamy delight. You might enjoy a bit of crusty bread on the side to mop up the last of the sauce. We served this with steamed broccoli for a hearty meal. Leftovers, should you be so lucky, heat up really well for lunch (or dinner again).

Potato Stroganoff Skillet Dinner

Serves 4

500 grams ground beef (or ground turkey)
1 teaspoon canola oil
1 medium yellow onion
2 cloves garlic
200 grams mushrooms
Pinch thyme
1/8 teaspoon celery salt
2 cups beef broth (or stock cube & water)
600 grams nugget potatoes
1/2 cup cold water
2 tablespoons all-purpose flour
1/2 teaspoon ground white pepper
200 grams schmand (or smetana, or thick sour cream)

Peel and slice the onion into thin half-moon slices. Brush clean and slice the mushrooms. Wash and quarter the potatoes (if your potatoes are a bit bigger, cut them into wedges). Prepare a slurry by shaking together the cold water and flour in a lidded container. Peel the garlic.

In a large skillet over medium heat, heat the oil and then fry the ground meat until the water has evaporated and it begins to brown nicely (remember: no-longer-pink doesn't equal browning; take the extra minute or two). Add the sliced onion and stir through, and then add the sliced mushrooms and stir them through. Continue to stir and fry for another 5 minutes or so, until the mushrooms have given up their liquid and the onion is tender. Add a tablespoon of water to keep it from sticking, if needed. Add the white pepper and celery salt, and stir through.

Add the potatoes to the skillet and stir them through so they get coated in the meaty flavours. Next, gently stir in the beef broth. Crush (or mince) the garlic and stir it in. Let the heat come up to a simmer, and add the slurry (give it a final shake just before adding). Stir the slurry through and return to a simmer, and then turn the heat to low and put a lid on the skillet.

Let the skillet simmer gently, covered, on low for ten minutes, and then stir and let simmer (still covered) another ten minutes, or until the potato quarters are fork-tender. You can stir periodically if you're worried about the potatoes sticking to the pot, but don't lift the lid too often or the potatoes will take longer to cook. Stir in the schmand (or heavy sour cream) until smooth, and let the dish come up to a simmer one final time, and then it's ready to serve.


December 03, 2017

Çılbır: Turkish Poached Eggs in Yoghurt with Spiced Butter


I love a good breakfast, and Turkish culture really knows how to do it up as a feast. Menamen (scrambled eggs in pepper sauce) might be the best known (internationally) egg-based breakfast dish from Turkey, but by golly cilbir should be on everyone's list, too. Cilbir (anglicized somewhat from Çılbır) is pronounced, roughly, as CHILL-ber (like Wilbur, but, you know, chill).

What is it? Well, the beauty-base-zero version is poached eggs in garlicky yoghurt, drizzled with browned butter infused with chile flakes. There are a LOT of variations to be had, though - most of which appear to be placing the basic version on top of an additional element - kıyma, for example (fried seasoned ground meat), or sautéed spinach (like a Turkish version of eggs Florentine). This versatility explains why cilbir is eaten not only for breakfast, but for any other meal of the day.

Between the above description and the pictures, you probably don't need a recipe, but I'm going to give you one anyway:

Çılbır: Turkish Poached Eggs in Yoghurt

Serves 2

Yoghurt base

300 grams plain thick yoghurt
1-2 cloves garlic, minced or pressed
2 tablespoons minced fresh parsley (or dill, or mint)
1 teaspoon olive oil
1/4 teaspoon kosher or coarse sea salt

2 - 4 Poached eggs

I'm going to assume you know how to poach eggs, and have a preferred method. If not, go ahead and google it, or even just fry your eggs sunny side up, or soft boil them (I won't tell)

Spiced Butter

2 tablespoons salted butter
1/2 teaspoon - 2 teaspoons Turkish pepper flakes (eg. Aleppo) or paprika, adjusting for the level of heat as desired


Assembly

Prepare the yoghurt base first, because you want it more room-temperature than fridge-cold. I take the yoghurt out of the fridge as soon as I get up, before I shower or make coffee, to let it warm up a bit. When you're ready to get cooking, combine the yoghurt base ingredients in a small bowl, and beat until everything is well integrated. Set aside for the flavours to mingle while you prepare the rest.

Warm a couple of bowls by filling them with hot water and letting them stand. You probably don't need to do this in the summer.

Prepare the spiced butter next. Melt the butter in a small pan over medium heat. If you are using unsalted butter, add a tiny pinch of salt. Reduce the heat to medium-low and let the butter boil and seethe until the water evaporates and the milk solids start to brown (alternatively, you can use ghee). Remove the butter from the heat, and add the chile flakes. I was using extra-hot oiled Pul Biber (Turkish chile flakes), so I didn't add a lot, but with a milder chile you can add quite a bit more (which does look very pretty). Let the butter and chile flakes infuse together while you prepare the eggs.

Prepare the eggs as you like - I poached mine in a skillet of bubbling water for 5 minutes, but your mileage may vary.

Just before the eggs are ready, take your warmed bowls (drained and dried) and add a generous spoonful of yoghurt base into the bottom of each. Use the spoon to swirl it out to cover the bottom of the bowl. When the eggs are ready, use a skimmer to lift them from the water, and place them in the bowls. Use a teaspoon to drizzle the desired amount of spiced butter over and around the egg(s). Serve at once with warm flatbread, and maybe some nice sliced vegetables and hummus.


July 29, 2017

Loco Moco


Loco Moco is Hawaiian comfort food suitable for breakfast, lunch, or dinner, and is such a hometown favourite that it appears everywhere from takeaway windows, to diners, to fine dining restaurants.

Four essential ingredients comprise the classic Loco Moco: white rice, ground meat patty, fried egg, and brown gravy. The number of patties and eggs is variable, but even the petite offering shown here, of a single patty and a single egg, makes for quite a substantial meal.

There are other variations, of course. Fried rice instead of rice, being one. The meat patty could be replace with fried spam, and there may or may not be mushrooms in the gravy. Some places ask if you want sautéed onions or not, but in this version they're already right in the gravy. Loco Moco often appears as an option on Hawaii's famous Plate Lunch, which pretty much guarantees a scoop of macaroni salad on the side. In Japan, where Loco Moco has migrated quite happily, it is often served with Tonkatsu sauce instead of brown gravy, which gives it an altogether different effect.


Serving the egg as the topmost layer is picture pretty, but most places drench the egg with extra gravy - sometimes so much so that the takeaway container threatens to overflow. It is big food. Generous food. Comfort food.

So here's how you make it:

Loco Moco

Serves 2-4

3-4 cups hot cooked long grain white rice
4 hamburger patties in brown gravy (or Salisbury Steaks with a little soy sauce spiking the gravy)
4 fried eggs

Divide the rice between the dishes (pasta bowls work really well for this). Top the rice with one or two hamburger patties and a big spoonful of gravy. Top the patties with the fried eggs, and ladle extra gravy over it all. Serve with soy sauce and/or hot sauce on the side.

This is also a great way to use up extra Salisbury steaks, if you have some in the fridge, but if you want to make the patties up from scratch, it can still be done up pretty quickly:

500 grams lean ground beef (or beef/pork mixture)
1/4 teaspoon kosher or coarse sea salt
1/2 teaspoon black pepper
1/2 teaspoon Worcestershire sauce
Pinch of ground cumin
Pinch of ground cayenne
1 shake of Tabasco pepper sauce
a bit of all-purpose flour to dust the patties
1 teaspoon butter or oil for frying

For the gravy:
1 medium onion, sliced pole-to pole
2 cloves garlic, minced or pressed
1/2 teaspoon Worcestershire sauce
1-2 teaspoons Low-Sodium Soy Sauce
3 cups beef broth (or stock from a prepared base, such as Better than Bouillon) - preferably low sodium
3 tablespoons all-purpose flour (shaken together with 125 mL (1/2 cup) cold water to make a slurry)

Put the rice on to cook first. While it cooks:

Mix together the meat and seasonings with a fork or your impeccably clean hands, and shape into four flat patties. Sprinkle the patties with flour on each side, and shake of any excess. Fry them in a large, hot skillet (in which you have melted the butter or heated the oil) over medium heat until well-browned on each side. Don't worry about cooking them through, they will finish cooking in the gravy.

Once the patties have been nicely browned, remove them to a plate while you make the gravy. To the emptied pan, add the onions and garlic, and stir them through, scraping up the fond on the bottom of the pan. Add the Worcestershire sauce, and soy sauce, and stir and cook until the onions turn translucent and start to get tender. If the pan is too dry, lower the heat a bit and add a tablespoon of water or so at a time until there's no danger of scorching.

Add the beef broth and stir through, being sure to scrape up the flavourful bits on the bottom of the pan. Make a slurry of the flour with the cold water to make a smooth, thick liquid, and add it to the skillet, stirring. Stir it all through until it is thoroughly integrated with the onions and stock. It will start to thicken the gravy immediately, but it will take about 20 minutes of cooking for the flour to cook through and lose its paste-like raw taste, so don't be impatient if it doesn't taste great right away. Return the patties to the sauce, lower the heat to it's lowest setting, and continue to stir periodically, until the gravy has a delicious meaty flavour. You can cover the pan if you like, but I don't usually find it necessary. If it gets too thick, add a little water to thin it to your preferred gravy consistency.

If your patties didn't brown very much, your gravy might be pale in colour. It should still taste good, though, but you can get a nicer colour by adding a few drops of dark soy sauce (not regular). It's on point for the dish flavour-wise, and it's a near miraculous gravy-browner.

When the rice is cooked and the patties and gravy are ready, fire up another skillet and fry up some eggs. Sunny side up is traditional, but over easy (or over hard) is fine if that's how you roll.

Layer the ingredients quickly and dive in.

May 05, 2017

Spicy Cauliflower & Ground Meat Skillet Dinner


This is quick, delicious, and oh-so-easy. We use habanero peppers, because we can get them more easily than we can jalapeños, but you can use any chile pepper you like, really. Kind of a cauliflower hash, as it were, but not so...hashy?

What it is, is very filling and satisfying. It's also low carb, if that interests you, or are just looking for something different from the cycle of potato-pasta-rice-bread that make the foundation of so many dinner calendars.

Spicy Cauliflower & Ground Meat Skillet Dinner
Adapted from Gluesticks & Gumdrops

Serves 2

1/2 large head of cauliflower, separated into small florets
250 grams ground beef or beef/pork mixture
1/2 tablespoon canola oil
1/2 large onion, finely diced
2-3 cloves garlic, minced
1 habanero chile pepper, de-seeded
1/4 teaspoon cayenne or other powdered chile
1/4 teaspoon ground cumin
1/2 teaspoon coarse sea salt
60 grams cheddar cheese, grated
black pepper, to finish
cilantro, for garnish
Water, as needed

Do your mise en place first: separate the cauliflower, chop the onion, mince the garlic, grate the cheese, and de-seed the hot pepper (carefully). Wash and dry the coriander, and tear the leaves off of the thicker stems (you don't need the stem here).

Heat the canola oil in a large over medium-high temperature, and add the ground meat. If your meat is a bit fatty, you might not need the oil at all, or you might need to spoon a little off after it's fried. You want a bit of oil to thoroughly brown the meat, but not so much that it becomes greasy. If you are using lean meat, you shouldn't have to drain anything.

Break up the meat with a wooden spoon or spatula as it fries, and let it get some nice golden brown colour before you add anything else. Don't just fry it until it loses the pink - you don't get good flavour from grey meat. When it is satisfactorily browned, add the onion and garlic, and stir through. When the onion turns translucent, add the chile pepper and the salt, cayenne, cumin seasonings. Stir and continue to fry until the onions are tender and a bit browned at the edges.

Add the cauliflower and stir it through, coating it with the spicy juices already in the skillet. Add a couple of tablespoons of water, and stir through again. Continue to cook and stir, adding splashes of water where necessary to keep the mixture loose an not burning, but not enough to make a gravy. You can also put a lid on and turn it to low for a few minutes to make sure the cauliflower gets cooked through to your satisfaction.

When the cauliflower is tender, it's time to finish. Scatter the grated cheddar evenly over the pan, and put a lid on for a few minutes - just long enough to melt the cheese. Use a wide spatula to lift sections from the pan onto the plate, trying to keep the cheese top-most if possible. Garnish with black pepper and cilantro. Devour.

You can of course use more cheese to make this an even more deluxe dish, but it's lovely the way it is, and perfect for someone looking for a lighter (but still satisfying) meal.

Not hot enough? You can always top it with the fiery hot sauce of your choice.

April 01, 2017

Freezer Burritos (and website news)


Well, it looks like my older website for Always In The Kitchen has finally expired and been taken offline. Don't worry, this blog is still active, and I still have all of the recipes, so I'll begin adding them to the comments sections of various blog posts that formerly just contained the links.

In the meantime, if you find any dead links where the recipe has not yet been added into the comments at the bottom, please let me know. I plan to add all of them, but it could take a while, and any of the older recipes that didn't have a link on the blog will be getting a whole new blog post, like this one.

Freezer Burritos

These are a delicious make-ahead worthy of taking up space in your freezer, ready to be a tasty packed lunch or emergency dinner. The inclusion of rice makes them technically "Mission-style" but, as discussed below, these are highly customizable.

Total prep and cooking time: 45 minutes more or less, depending on how fast you are at filling and rolling.

1 cup (200 grams) uncooked rice
1 (425 gram) can* black beans
1 (525 gram) can* pinto or kidney beans
1 cup (250 mL) frozen corn kernels, rinsed in warm water, drained
1 cup (250 mL) jarred salsa
10 (12 inch) flour tortillas (make sure they’re flexible - warm them if necessary to make rolling easier)
250 grams Pepper Jack cheese, shredded (or cheddar)
2 tablespoons Tabasco sauce, or hot sauce of your choice
1 tablespoon ground chile powder
1 teaspoon ground cumin
1 teaspoon dried oregano leaves
1 cup chopped fresh cilantro (use parsley or green onions if you're cilantro-phobic)
1-2 minced jalapeño peppers

*Please note that the can-sizes are approximate, based on what was available in my area at the time this recipe was being developed. If your cans are a bit smaller or a bit larger, it will be fine.

Cook the rice in your usual fashion, adding some Mexican or Southwest Seasoning or extra chile powder (1 teaspoon, approximately) into the water. Allow to cool somewhat while you prepare the rest. Drain and rinse beans and corn. Add salsa, and toss to mix. Transfer to a large bowl, and mix in the rice and cheese and seasonings (spices, cilantro, and peppers). Mix very thoroughly. Taste and see if you need to add more spices or hot sauce. Divide the mixture evenly among the tortillas, and roll up. Wrap individually in plastic wrap, place into a large freezer bag, and freeze. Reheat covered, but unwrapped, in the microwave on high for about 3 minutes. Liberally apply extra hot sauce, such as Cholula (ie. a thicker sauce, rather than a thin one like Tabasco or Louisiana).

I usually plan to have these for dinner on the day that I make a batch. Instead of microwaving them, I spritz them lightly with canola oil and bake them on a cookie sheet, in a 400 F oven, or until the edges are crispy and golden. You can also pan-fry them in a bit of canola or peanut oil, using tongs to rotate them for even browning.

For a non-vegetarian version, substitute one of the cans of beans with ½ pound cooked ground beef (season well, and drain off any fat) or ground chicken or turkey for a leaner meaty version. It’s slightly more work, but very tasty.

I usually get 10 (sometimes more) burritos, depending on how big the tortillas are, how much I've tinkered with the filling, and how much of the filling I've eaten while rolling up the burritos.

These are of course highly customizable - just keep an eye on the volume of filling you're making. I've been known to add minced bell pepper, Mexican pickled onions (chopped), leftover mole sauce, leftover roast chicken, (I divide the shredded roast chicken between each burrito rather than mixing it into the filling). Leftover pulled pork would of course also work very nicely. I'm thinking right now that black bean and roasted butternut squash would be an excellent plant-based variation.

March 04, 2017

Zhajiangmian: Beijing-style "Fried Sauce Noodles"


This is a delicious and simple dish (炸酱面, zhá jiàng miàn) that appears in a variety of styles within China, as well many iterations and similar dishes in other parts of Asia, from the almost black Jajangmyeon in Korea to the dry-style ramen dish Ja Ja Men in Japan.

It's easy to make if you have a well-stocked Asian pantry, and it's good enough to warrant picking up any ingredients you might not already have on hand. I like spicy food, so I've added a bit of heat that may or may not appear in restaurant versions (some will serve it either way, and some will simply bring you a jar of chile oil if you ask). The amount of umami in this is ridiculous.

The uncooked vegetable garnishes are an important part of this dish, bringing a fresh crunch and brightness to the dark heat and intensity of the sauce. The use of dark soy sauce instead of regular brings depth to the colour of the fried sauce.

This serves two generously.

Zhajiangmian

Lightly adapted from The Woks of Life

Serves 2

175 grams thick wheat-based dry noodles

250 grams ground pork
1/8 teaspoon salt
1 teaspoon cornstarch
1/2 teaspoon peanut oil, plus 1 tablespoon
1/8 teaspoon white pepper

3 slices ginger, minced finely
4 cloves garlic, pressed or finely grated
6 fresh mushrooms (shiitake, if available), finely chopped
1 tablespoon Hoisin sauce
2 tablespoon chile bean paste
2 tablespoons yellow soybean paste
1/2 tablespoon sambal oelek or 1/2 - 1 teaspoon chile oil
1 tablespoon dark soy sauce
1 cup water

Garnish
1/2 cup julienned carrots
1/2 cup julienned cucumbers
1/2 cup julienned scallions

In a mixing bowl, combine the ground pork, salt, cornstarch, 1/2 teaspoon peanut oil, and white pepper, and stir well until completely integrated. Set aside.

Prepare the mushrooms, ginger, and garlic. In a small bowl, combine the Hoisin sauce, chile bean paste, yellow soybean paste, sambal (or chile oil), and dark soy sauce, and mix well.

Set a large pot of water on to boil for the noodles. Meanwhile, heat the remaining tablespoon of oil in a medium or large skillet, and add the meat mixture. Fry and stir, breaking up the meat with a spatula, until the meat is well browned, and then add the chopped mushrooms. Continue to fry over medium high heat, adding a tablespoon of water if necessary to prevent sticking or burning. When the mushrooms have softened and shrunk a bit in size, add the sauce mixture and stir through until the pork is thoroughly coated. Add the water, stirring it in slowly, and simmer gently until the sauce is thick. While it simmers and the noodles are cooking, prepare the fresh vegetables - julienne the carrots, cucumber, and scallions.

When the noodles are cooked, drain them divide between two bowls. Spoon the meat mixture over the noodles, and garnish with the julienned fresh vegetables.

February 25, 2017

Black Beans & Rice with Sausage


This recipe takes inspiration from those dry packet mixes for black beans and rice, but using fresh ingredients and a lot less salt. It's a fairly quick meal to make, labour-wise (about 45 minutes, most of which is unattended cook time), and while there's a bit of chopping involved, there's not a lot of clean up: cutting board, knife, skillet, spatula, bowls, forks. It's easy, it's delicious, and it reheats well for lunch the next day.

If you want a more Cajun-y version, replace the seasonings listed below with a Cajun spice blend.

Vegetarians/Vegans could either replace the sausage with a similarly styled plant-based sausage, smoked tofu, or simply increase the amount of black beans.

Black Beans & Rice with Sausage

Serves 4

140 grams Cabanossi sausage (or Kolbassa)
2 medium stalks celery
1 medium onion
1 medium red or green bell pepper
1 teaspoon vegetable base (I use reduced sodium)
2 cups canned black beans, rinsed and drained
1 cup parboiled rice
2 clove garlic, minced
1/2 tablespoon olive oil
1/4 teaspoon celery salt
1/2 teaspoon white pepper
1/2 teaspoon ground cumin
1/4 teaspoon cayenne pepper (or to taste!)
2 dash Tabasco pepper sauce
1 3/4 cups water, from a recently boiled kettle
sliced green onions for garnish (optional)

Prepare the sausage by slicing it once lengthwise and then slice cross-wise into half-coin pieces. Prepare the vegetables by peeling or trimming as needed and dicing into thumbnail-sized chunks. I like to string my celery, if it's particularly tough. Mix the seasoning spices in a small bowl and set aside.

In a large skillet, sear the sausage slices, then push to the sides of the skillet and add the diced onion, garlic in the olive oil until it starts to turn translucent. Add the diced pepper, beans and spices, and stir through gently. Let cook, stirring, for about a minute, and then add the Tabasco sauce, rice, and 1 & 3/4 cups boiling water. Bring the mixture back up to a simmer, stirring, then immediately cover. Turn down the heat to a bare simmer and leave undisturbed (no peeking!) for 25 minutes. When it is done, stir through gently. Sprinkle with sliced green onions and serve.

January 07, 2017

Turkey Congee


Congee (also called jook in Cantonese, amongst many other names worldwide) is a rice porridge popular throughout Asia, and there are many different ways to have it. At its most basic, it is a blank canvas for your favourite flavours, whether you need it to be soothing and restorative, or something a little more lively. It is almost infinitely customizable to what you already might have available in your kitchen. It can be meat-based, or vegetarian, or vegan. Congee isn't always made from rice (millet, mung beans, barley, and sorghum are some of the other variations), but rice is by far and away the most common version. It is a popular any time of day - from breakfast to late night, post-pub snack. Every time I make congee, I remember how much I love it, and vow on the spot to make it more often.

This version came from my desire to make something with the strong turkey stock that I made from the bones of our Christmas turkey. Since I'm generally pretty well stocked for Asian condiments and garnish-ingredients, I was able to make this with what was on hand.

It does take a while to cook, but it's fairly low effort, even so: stir it every so often, and it takes care of itself.

Turkey Congee

Serves 2

100 grams (about 1/2 cup) long or short grain rice
1 litre (4 cups) water
250 mL (1 cup) strong turkey stock
1/2 - 3/4 teaspoon coarse salt
1 cup diced or shredded cooked turkey meat

Garnishes

1 clove of fresh garlic, finely slivered
1 inch fresh ginger, finely slivered
1/4 cup thinly sliced green onion
cilantro leaves
slices of red chile pepper
a few drops of sesame oil

You can garnish lightly or heavily, depending on what you have on hand:

Other typical congee garnishes might include:

Youtiao (Chinese doughnut/cruller)
hot chile oil
soy sauce (not too much, or it will overwhelm)
peanuts
pork floss
fried shallots/shallot oil
preserved duck egg
lettuce (stirred in at the end)
sliced mushrooms
preserved greens
...and many more (and that's not even counting featured ingredients, such as the turkey in this version.

Wash your rice well in cool water. Meanwhile, bring the litre of water listed in the recipe to a boil in a medium-large soup pot, and once it is boiling, add the stock and the rice. Reduce the heat to medium-low until the mixture is bubbling enthusiastically, but not at a rolling boil, cock a lid half-on the pot (to let steam escape, and set the timer for 20 minutes. Feel free to stir occasionally.

When the timer goes, give everything a good stir, making sure there's nothing stuck to the bottom of the pan. I like a wooden spoon for this. Taste the broth, and add the salt. Start with 1/2 teaspoon (especially if you are using a salty, commercial turkey stock, or will be adding soy sauce later), and add more later if needed. Stir well and leave it to cook, uncovered, this time, stirring occasionally, for another 20 minutes on the timer.

When the second timer goes, check on it again. It should be much thicker (and more likely to start sticking to the bottom of the pot), but still not completely at congee-texture. These things take time. Stir it really well, and put the timer on for another 20 minutes, uncovered. At this time, you can chop or shred the turkey meat and have it standing by, and you can start to prepare the other garnishes.

When the timer goes for the third time, add the turkey meat to the congee, and marvel at how much thicker it has gotten. If it is too thick, feel free to add a half-cup of water (or more, but add only a little at a time) until it reach the consistency you like. Let the mixture cook, stirring frequently for 15 - 20 minutes, and then ladle into bowls. Top with the garnishes of your choice, and devour.

The below picture shows the finished congee, just before the garnishes are added. You can see a little of the turkey peeking through, but you can also see how thick the porridge itself is.

November 13, 2016

Salisbury Steak: Hamburger patties in gravy


This was a fairly common meal for us, when I was a child. Easily made, relatively quick to prepare, and tasty. My mother would have had at least one more hot vegetable on each plate (or a salad), as well as a dish of pickles or radishes on the table. She was ahead of her time in making sure we got our vegetables in. Sometimes we'd have mashed potatoes, sometimes merely boiled and left whole (or chopped), sometimes baked.

While there are some ingredient differences between Salisbury steak per se and a simple hamburger patty in gravy (the Salisbury steak is named after Dr JH Salisbury, a proponent of low-carb diets), the method is essentially the same: create a meat patty and fry it up in a skillet, in which a gravy is then built after the patties have browned. There are of course similar dishes all over the world - everything from Japanese hambagu to Russian Koteleta to German Hacksteak, and doubtless many more. Salisbury Steak also holds the perhaps dubious honour of being one of the iconic meals available as a Swanson brand TV Dinner (although it was not the very first offering thereof).

At home in Canada I generally used all beef (or occasionally bison) for the patties, but here in Germany I use either beef or a combination of beef and pork (which is the standard most economical offering of the region). While a certain amount of filler material is apparently acceptable, mine are always just meat and seasoning spices. I make the gravy with either just onions or onions and mushrooms, depending on what I have in the house. The gravy is a bit variable in terms of thickness, because I don't tend to measure the amount of flour that I use. This one is a bit thinner than it often is, but it was equally delicious on the patties and on the mashed potatoes. I use lean meat for these - extra lean makes for a bit of a drier patty.

Salisbury Steaks

Serves 4

500 grams lean ground beef (or beef and pork)
1/4 teaspoon kosher or coarse sea salt
1/2 teaspoon black pepper
1/2 teaspoon Worcestershire sauce
Pinch of ground cumin
Pinch of ground cayenne
1 shake of Tabasco pepper sauce
a bit of all-purpose flour to dust the patties
1 teaspoon butter or oil for frying

For the gravy:
1 medium onion, either sliced pole-to pole or diced
6 button mushrooms, cleaned and sliced (or chopped) - optional
2 cloves garlic, minced or pressed
2 shakes Worcestershire sauce
pinch of whole mustard seed (optional)
1.5 cups beef broth (or stock from a prepared base, such as Better than Bouillon)
2 tablespoons all-purpose flour (shaken together with 60 mL water to make a slurry)

If you're making the family style of dinner above, put the potatoes on to boil first. Once they are going, mix together the meat and seasonings with your impeccably clean hands, and shape into four flat patties. Sprinkle the patties with flour on each side, and shake of any excess. Fry them in a large, hot skillet (in which you have melted the butter or heated the oil) over medium heat until well-browned on each side. Don't worry about cooking them through, they will finish cooking in the gravy.

Once the patties have been browned, stack half of them into twos and push them to the side. Add the onions and garlic, and stir through the fond. Add the mushrooms, Worcestershire sauce, and mustard seeds (if using), and stir and cook until the onions turn translucent and the mushrooms give up some of their liquid. If the pan is too dry, add a tablespoon of water or so at a time until there's no danger of scorching.

Add the beef broth and stir through. Make a slurry of the flour with just enough cold water to make a smooth, thick liquid, and add it to the skillet. Stir it through carefully until it is thoroughly combined with the onions, mushrooms, and stock. It will start to thicken the gravy immediately, but it will take about 20 minutes for the flour to cook through and lose its raw taste, so don't be impatient if it doesn't taste great right away. Spread the patties out in the sauce, lower the heat, and continue to stir periodically, until the gravy has a delicious meaty flavour. You can cover the pan if you like, but I don't usually find it necessary.

If your patties didn't brown very much, your gravy will be pale in colour. It should still taste good, though, but you can get a nicer colour by adding a few drops of dark soy sauce (not regular). This will make it a touch more salty, though, so be aware of that, especially if you're using a salty meat broth or stock.

At this point, the patties can be held for a while if necessary to let the potatoes finish cooking, or to wrangle any other vegetables that you want to include in your meal. Put the lid on if you like to keep to much liquid from evaporating.

Serve up the patties with a spoonful of the gravy over them. These reheat very nicely for lunches the next day, and also make very good sandwiches (I usually slice them horizontally for sandwiches, and add a slice of cheese).

June 15, 2015

Imam Bayīldi - Turkish Eggplant Casserole


Traditional recipes for Imam Bayīldi involve stuffing hollowed out eggplants (or halved eggplants) with onions and spices, and braising them in a surfeit of best quality olive oil until tender. I've made some serious versions in the past, but they've always felt like a lot of work for something that is primarily a side dish to me (although I acknowledge that it makes a terrific main course for lunch). So, naturally, I was very excited to see this streamlined casserole version from Feed Me Phoebe.

The slightly scandalous name, which translates "The Priest Fainted" has entertaining stories as to why exactly, the Imam keeled over - everything from swooning at the deliciousness to fainting at the cost (or sheer amount) of the olive oil. Various other versions abound in the Eastern Mediterranean, varying the spices, or in some cases the vegetables. I assume that there are versions of this that date back to considerably before the introduction of the tomato, but it seems that the tomato-and-onion version is one of the most popular.

Imam Bayīldi

Serves 4

2 small (but not baby) eggplants
Kosher or coarse sea salt
Olive oil (about a third of a cup, total)
1 small yellow onion, finely diced
2 large garlic cloves, minced or pressed
1/4 teaspoon chile pepper flakes
Dash of cinnamon
Dash ground white pepper
400 mL canned diced tomatoes, with juices
1 tablespoon tomato paste
1/4 cup finely chopped fresh parsley, divided

Prepare the eggplants by removing the cap and slicing lengthwise into 1/2 centimetre thick slabs. If you cut them into coins, it's much harder to get even coverage of the pan without gaps, so lengthwise is by far the better way to go for this dish. Dissolve a generous tablespoon of salt in hot water, and then add cold water until you have about six cups in a large bowl. Add the eggplant slices and allow them to brine for 10 minutes, or up to 8 hours. Drain, rinse, and press the slices firmly with paper towels or fresh linen towels to dry them out.

In a medium skillet (this one is a 24 centimetre steel skillet), heat a tablespoon of olive oil over medium-high heat until it just shimmers. Tilt the pan to ensure the bottom of the pan is well coated. Have a receiving plate standing by. Fry the dried-off eggplant slices, in batches, with a little extra olive oil added between each batch, just until golden on each side - about one or two minutes per side. Remove them to the nearby plate as they finish to make room for the next pieces.

Preheat your oven to 180 C (350 F) with a rack in the middle.

When all the eggplant has been fried, start building the sauce in the same (now emptied) skillet. Start by adding a little more olive oil (this is the last addition of olive oil), and then add the onions and garlic. Add a pinch of salt (not much, especially if your canned tomatoes are salty) the chile flakes, the cinnamon, the white pepper, and half of the parsley. Sauté until translucent and tender, and then add the diced tomatoes and their juices, and the tomato paste. Cook altogether until it starts to resemble a sauce, about four or five more minutes. Then remove about 2/3 to 3/4 of the sauce to a nearby bowl, wipe down the edges of the skillet, and start layering the eggplant into the skillet, on top of the bit of sauce that should nicely coat the bottom of the pan. Alternate the layers of eggplant with the layers of tomato sauce, and try to stack the eggplant slices in so they cover the surface of the pan in a neat, jigsaw like fashion. Make sure the top layer is sauce (ideally a thin layer of sauce so you can admire the prettiness of the eggplant slices), and place it, covered, in the preheated oven. If I use small eggplants, I only get two layers from them, but that works nicely with the amount of sauce.

Bake covered for 25 minutes, and then remove the cover and bake for another 20 minutes. Remove and allow to cool somewhat before serving. Garnish with remaining parsley.

This dish is often served at room temperature or even chilled, so it makes a surprisingly good picnic dish (or take to work dish). Paired with a nice chickpea salad, it's a beautiful, satisfying lunch.

May 04, 2013

BBQ Pork Fried Rice


Fried rice is a culinary wonder. How else can you take a few bits of meat, an egg, some scraps of vegetables, and leftover rice, and make a meal worthy of a feast? But...what if you have no leftover rice? Fried rice is the valedictorian in the argument for making more rice than you need to. Still, I've been known to fire up the rice cooker first thing in the morning, to make sure I have "leftover" rice for dinner in the evening. As I did, in fact, this time.

Fried rice can be an intensely personal dish - we all have a favourite version (or versions) that define it in our minds and in the expectations of our stomachs. One of the most delicious ones I know is a dried scallop and egg white fried rice prepared by a local restaurant. It is incredibly pale, with only coins sliced from (I think!) gai lan stalks to relieve the otherwise monochromatic rice-scape. One day, I'll take a crack at making that one, too.

My at-home go-to fried rice, however, is very simple. I pick up some char siu from a Chinese market (or restaurant) on the way home and, if I have successfully avoided simply eating it all straight out of the container, into the skillet it goes.

I make this in a large non-stick skillet, as opposed to a wok, but feel free to use a wok, especially if you have a gas burner that can get it hot enough. As you can see, this goes wonderfully with Beijing Wings and blanched gai lan with oyster sauce (or choy sum with hoisin sauce).

BBQ Pork Fried Rice

Makes about 4 cups

150 grams Chinese barbeque pork
1 tablespoon vegetable oil
1-2 eggs, lightly beaten
1/2 small (yellow) onion, finely diced
1 rib celery, sliced thinly
1 tablespoon slivered fresh ginger
2 tablespoons low-sodium soy sauce
1/4 teaspoon sesame oil
3 cups steamed rice, cooled
1-2 finely sliced green onions

Dice pork into small cubes and set aside. Separate the cooled rice gently with your fingers (a quick spritz of cooking oil can help) so that no large chunks remain.

Heat 1/2 tablespoon oil in hot skillet and stir-fry yellow onion, celery and ginger for 30 seconds. Add the pork and stir-fry for a further 30 – 60 seconds. Stir in soy sauce and sesame oil and cook, stirring, for 1 minute. If you want to add snow or snap peas (a very nice optional extra), add them now, and stir fry for another 30 – 60 seconds. Push everything to the edges of the pan, leaving a bare space in the middle. Add the remaining 1/2 tablespoon of oil, and pour the beaten eggs into it. Let the eggs set for a minute, and then add the rice, spreading it quickly around the pan. Stir-fry for a minute or two, using a spatula to break up the eggs into small pieces. Lastly, add spring onions and stir-fry for a further 30 seconds or until well combined and rice is heated through.

Transfer rice to a platter and serve with soy sauce and hot chile oil on the side.