Showing posts with label Moroccan. Show all posts

May 20, 2017

Kefta Mkaouara: Moroccan Meatball & Egg Tagine


The very first meal that we had in Marrakech was a wonderful feast prepared by the cook our our riad (traditional Moroccan boutique hotel), featuring a variety of salads, and this iconic meatball & egg tagine. Arriving late at night after a significantly delayed flight, we were extremely grateful for two things: first, that we had arranged a driver through our riad to bring us in from the airport, and second, that this meal was waiting for us when we finally staggered through the door.

There are a lot of recipes for this dish out there in the wilds of the internet, and I initially tried one I found that looked pretty good but ended up swimming in copious amounts of a sauce more reminiscent of a displaced marinara. So, I researched a little harder, and then dug into my notes from our trip to Morocco. This is the result, which feels much closer in spirit to what we had in Morocco. There is enough sauce to provide a condiment to the meatballs and also to cook the eggs, but not an excessive amount.

Tagines are traditionally served with bread, rather than rice or couscous, so I picked up a couple of khobz-like flatbreads from a local bakery, and served the tagine with lemony, Moroccan-style carrot salad and spiced olives on the side.

Kefta Mkaouara
(Moroccan Meatball & Egg Tagine)

Serves 4

550 grams mixed ground beef and lamb
1 large whole egg, beaten
1/2 teaspoon kosher salt
1/2 teaspoon ground white pepper
1/2 cup panko-style bread crumbs
2-3 teaspoons Ras el Hanout* spice mixture, divided
1/2 tablespoon olive oil
1/2 cup parsley, divided
1 1/2 cups canned diced tomatoes (low sodium preferably)
1 medium yellow onions, diced somewhat finely
2 clove garlic, minced
1 tablespoon tomato paste
1/2 teaspoon ground turmeric
1 teaspoon chili flakes
4 eggs

In a large mixing bowl, beat the egg and add the panko, a teaspoon of Ras el Hanout, and half the parsley. Stir together.

Break apart the ground meat in little pieces (I use my fingers for this), letting it fall on top of the egg/crumb mixture, and then season with salt and white pepper. Use a fork to gently (but thoroughly!) combine the ingredients into a homogenous mixture, being sure to distribute the breadcrumbs well throughout the meat. Shape into very small meatballs with a tablespoon or very small disher. You can leave them rough or rolls them between your palms to make nice rounded meatballs, each a bit smaller than a walnut. You should get 24 meatballs.


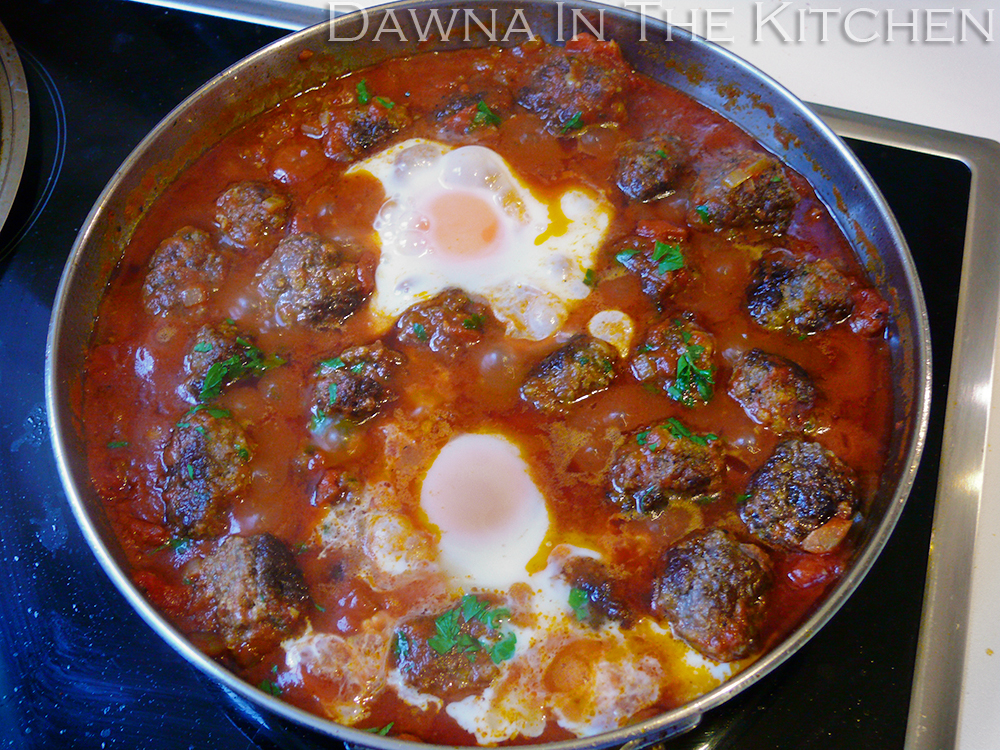
Heat the oil in a medium skillet (the one above is 23 cm) over medium-high heat, and brown the meatballs in batches (don't bother cooking them all the way through at this stage, and don't overcrowd the pan). Remove the browned meatballs from the pan to a plate, and add the diced onion and the garlic into the emptied pan. Sauté until the onions are translucent, then add the tomato paste and stir through. Sprinkle the turmeric, a teaspoon of Ras el Hanout, and the chile flakes over the onions, and stir through. Add the can of tomatoes with their juices. stir through. Cook altogether until it starts to resemble a sauce, about four or five more minutes. Turn the heat to low, and add the meatballs (and any juices that may have collected on the plate). Cover and cook for 10 minutes.


Make a "nest" in the meatballs to create space for each egg - one per person is usual. Crack an egg directly into each nest, season with a bit of salt and pepper, and cover. Continue to cook on low heat for 5 - 10 minutes more, depending on how done you like your eggs. If you plan to have meatballs leftover for a future meal, just cook the number of eggs that you need for the moment. The eggs can be freshly cooked when you warm up the meatballs and sauce the next day (or you can skip the eggs on the second pass, and just stuff the (warmed up) meatballs and sauce into a hollowed-out flatbread for a fantastic meatball sandwich. When reheating, you may need to add a tablespoon or two of water to loosen the sauce to an optimal consistency.

* If you are unable to find a premixed Ras El Hanout blend (we brought ours back from Morocco, but it is often available in grocery stores that stocks North African and/or Middle Eastern spice mixtures), you might want to make your own: This one, and this one both look like decent options.

November 23, 2016

Moroccan Eggplant Salad/Dip: Zaalouk


One of my favourite dishes from Marrakech was an eggplant salad called Zaalouk (also spelled Zalook, amongst other variations). Moroccan cuisine is very big on salads, both raw and cooked, and this is a particularly popular one. Although you can find zaalouks made from other vegetables than eggplant, it does seem to be the one most commonly seen in the wild. Sometimes it simply showed up unannounced alongside whatever tagine I had ordered, and sometimes I selected it (along with one or two other options), from a menu. Every time it was a little bit different, and every time it was delicious.

It's pretty easy to make although it does take a bit of time, but since it is usually served either cold or at room temperature, you can make it in advance. The preparatory stages up to frying the eggplant are pretty much the same as the Turkish Eggplant Casserole that I was raving about last summer (and still make often), and it's not impossible that both dishes are related to the Afghani dish Burani Bonjon. It's flavour profile is quite different from Baba Ghanoush, the eggplant dip/spread that North Americans seem most familiar with these days, but it can fulfill a similar role.

This recipe was adapted from Fleur d'Oranger, Masala & Co's traditional recipe. I made mine a bit coarser, because that was the way I usually received it in Marrakech, but really you can make it as coarse or as smooth as you like. This makes a small batch, but can be easily doubled.

Eggplant (Aubergine) Zaalouk

Serves 2 - 4

1 medium, firm eggplant
Kosher or coarse sea salt
Olive oil (about a quarter of a cup, total)
1 small yellow onion, finely diced
1 cup canned diced tomatoes with juices
1 tablespoon tomato paste
1/2 tablespoon (sweet) paprika
1/2 teaspoon pimentón de la vera (or other smoked paprika)
1 1/2 teaspoons ground cumin
small handful cilantro leaves (optional)

Prepare the eggplant by removing the cap and slicing lengthwise into 1/2 centimetre thick slabs. Dissolve a generous tablespoon of salt in hot water, and then add cold water until you have about six cups in a large bowl. Add the eggplant slices and allow them to brine for 10 minutes, or up to 8 hours (cover them with a plate or otherwise keep them submerged in the brine as much as possible). Drain, rinse, and press the slices firmly with paper towels or fresh linen towels to dry them out.

In a large skillet, heat a tablespoon of olive oil over medium-high heat until it just shimmers. Tilt the pan to ensure the bottom of the pan is well coated. Have a receiving plate standing by. Brush the first few (dried, pressed) slices of eggplant with olive oil, and fry them in batches, repeating with a little extra olive oil added between each batch, until golden on each side and very soft - about three minutes per side, depending on your heat level. Remove them to the nearby plate as they finish to make room for the next pieces.


Into the empty skillet, heat a bit more olive oil, and add the diced onion and sauté until soft and translucent. Add a good pinch of salt, and stir through. Add the tomato paste and stir through. Add the spices and the tomatoes with their juices, and stir through, lowering the heat to medium-low, and continuing to stir, scraping the bottom of the pan clear as you go. Cook and stir for about another five minutes. If you want to add a hot chile pepper or even just a pinch of pepper flakes, now is the time to do that.

Place the fried eggplant on a clean cutting board, and chop roughly. Add the eggplant back into the skillet, along with any accumulated juices/olive oil that might cling to the cutting board or plate. Add the cilantro, if using. Stir everything together and continue to cook, breaking up pieces and mashing lightly with your spoon or spatula. If it looks too dry, add a bit more olive oil.

When everything is nice and tender and any excess water has evaporated, about 10 minutes if you fried your eggplants thoroughly, remove from the heat and scrape into a serving bowl (taste-test a piece of eggplant to make sure it's cooked through with no hint of raw flavour). If you prefer a smoother dip, you can blitz it quickly in a mini-prep or with a stick blender or even vigorous use of a potato masher. Add a tiny drizzle of olive oil to the top, and set aside to cool. Cover with plastic wrap and refrigerate if not using within an hour or so.

Excellent on flatbreads or crackers, or on any plate-side. I tend to use it almost like a chutney, dolloping it onto my plate alongside other dishes.

October 11, 2016

Moroccan Chicken with Olives and Preserved Lemon: Djaj M'qualli bi Zeitoun


Chicken, lemon, and olives are a delicious culinary trinity that appear together in many iterations from many cultures, especially those around the Mediterranean Sea. If you've tried my sure-fire dinner classic Chicken Sahara, you'll find a version particularly adapted to the North American manner of cooking. If you look into the dish's roots, though, you'll find one of its fascinating grandparents in Djaj M'qualli (transliterations of which also vary quite wildly).

This is a traditional Moroccan dish, with a complex harmony of flavours and a really impressive use of onions. The recipe classically also uses a chicken liver in the sauce, which I wasn't able to arrange despite having had chicken livers the night before, but I'd really like to do it that way next time. Unlike Chicken Sahara, or many of the chicken-lemon-olive tagine recipes out there, this is, as you can see, something of an almost dry dish - the sauce reduces to a thick gravy that drapes over the chicken rather than providing a pool for it to swim in. This recipe was adapted minimally from Fleur d'Oranger, Masala & Co.

One more thing: If you made Preserved Lemons back in January? This is a terrific use for them!

Moroccan Chicken with Olives and Preserved Lemon

Serves 4

4 chicken leg quarters, whole, skin on
3 medium yellow onions, finely chopped
2 cloves of garlic, crushed
1 chicken liver (optional)
1 cup Moroccan purple or green olives
1/2 preserved lemon (or several pieces, seeds removed)
1 tablespoon soft or melted butter
1/2 teaspoon coarse salt
1/2 teaspoon freshly ground black pepper
1/2 teaspoon ground white pepper
1 teaspoon ground ginger
1/2 teaspoon ground cumin
1/2 teaspoon ground cayenne
1/2 teaspoon ground paprika
pinch of saffron threads, lightly warmed in a dry skillet
Water, as needed

For extra juicy chicken, brine it for four hours or so before proceeding.

Rinse and dry the chicken pieces. Combine the butter and the spices (except the saffron) into a spice paste, and massage all of the chicken parts thoroughly with the mixture. Lay the chicken pieces skin-side up in a single layer in a large skillet, and sprinkle the finely chopped onions and crushed garlic in between the pieces. Add enough fresh cool water to come half-way up the chicken. Turn the heat on high, and bring the water up to a simmer. Reduce the heat to the minimum, cover, and let the chicken simmer very gently until tender, about an hour.

Preheat the oven to 220C/425F.

Remove the lid from the skillet and use tongs to remove the chicken pieces to a baking sheet (I used a pizza pan). Place the chicken, uncovered in the oven and roast for 10-15 minutes or until golden brown.

While the chicken browns and crisps, turn the heat up to high under the onion/water mixture and start stirring and scraping the mixture, reducing the water and cooking down the onion down to a thick mass. Add the chicken liver now, if using, grating it into the sauce as it cooks. Continue to cook and stir as it reduces. Add the olives, and add the saffron now, too (rub it between your fingers over the pan to crush the threads). Slice away and reserve the peels of the preserved lemon and add the middle parts to the gravy. Continue to cook and stir as the sauce thickens up until it is a thick gravy.

Remove the browned chicken from the oven and arrange on a platter. Spoon the gravy (called a deghmira), including the olives, over the chicken. Thinly slice the preserved lemon peels and decorate the chicken with the resultant strips.

Serve with warm bread and a salad or two.

The lucky person who got to take leftovers to work the next day reported that the sauce was even better on the second day, so it might well be worth making this ahead, especially if you're having guests to dinner.


July 03, 2016

Harira


I continue to be inspired by my vacation in Marrakech last year, and as you can see I have many more Moroccan recipes still to explore.

Harira is a traditional soup from Morocco, and while it is enjoyed year-round as an appetizer or light meal, it gains particular significance during Ramadan, for many households being a significant dish for iftar, the traditional meal that breaks the daily fasting during that month. Its recipes are as varied as the households they come from, but generally are all based on a combination of tomatoes, legumes, a starch such as rice or pasta, green herbs, and spices. Meat is an optional component, but used in fairly small quantities as it is not the focus of the soup. I've used lamb in this version, because we have such an excellent supplier of good quality lamb that I cook with it as often as I can, but beef or chicken could be used instead or the meat could be omitted entirely. For a meatless, vegan harira, I would double the amount of lentils, and possibly also increase the amount of chickpeas.

The soup is thick and hearty, and always served with bread. As part of iftar, it might also be accompanied by dates, hard boiled eggs, small savoury pastries, even homemade pizza. Iftar is served just after sundown, and although it is Ramadan right now, we are not Muslim so we enjoyed the harira at our usual dinnertime.


This version of harira is pretty close to the one I first tried at the market restaurants that spring up every evening in Jemaa El Fna, the main square of Marrakech. It is adapted from MarocMama's recipe.

Harira with Lamb

Makes 7-8 cups

1 medium yellow onion
4 cloves garlic
5 large roma tomatoes
225 grams lamb, diced small (optional)
1 cup chopped parsley
1/2 cup chopped cilantro
4 tablespoons tomato paste
1 tablespoon olive oil
3/4 teaspoon salt
1 1/2 teaspoons black pepper
1 tablespoon sweet paprika
1 tablespoon turmeric
1 small pinch saffron, crushed between fingers (optional)
400 grams cooked chickpeas
1/4 cup dry green or brown lentils (washed)
30 grams spaghettini or other thin pasta (broken into short lengths)
1/2 cup unbleached all-purpose flour
5 cups water

Prepare your mise en place: roughly chop the onion and garlic together, and the tomatoes and herbs each separately.

In a food processor, puree the onion and garlic until smooth (a tablespoon of water may help this process).

In a Dutch oven, heat the olive oil over medium heat. Add the onion/garlic puree, and stir and cook for a few minutes. Increase the heat slightly, and add the meat, if using. Stir and cook the meat until it has lost its raw look on all sides.

Add the tomatoes to your now-empty food processor and quickly puree. Add the pureed tomatoes, tomato paste, chopped herbs, salt and the spices, and stir well. Add four of the five cups of water, and bring up to a simmer. Add the washed lentils and chickpeas, and stir through. Reduce the heat to a bare simmer, and let cook for an hour, to let the lamb get tender. This can be reduced to 30 minutes if you aren't using the meat - long enough for the lentils to get tender.

While the soup is simmering, whisk together until smooth the remaining cup of water with the flour. Let it stand while the soup cooks, so that the flour fully hydrates.

When the lentils are cooked and the lamb has had some time to get tender, add the broken pasta and stir through. Then, stirring constantly, add the flour/water mixture in a thin, steady stream. The soup will start to thicken very rapidly, but keep stirring it until all of the flour mixture has been added. This is a very thick soup. Cook and stir for another 20 minutes, to allow enough time for the raw taste of the flour to cook out, and for the pasta to cook. You will need to keep the burner on its lowest heat and stir the soup regularly, to prevent the scorching. Serve as an appetizer or whole meal, with bread and any other accompaniments you like.


June 25, 2016

Moroccan Orange Slices with Orange Flower syrup


This is an incredibly refreshing dessert, particularly after a rich meal, or a meal eaten late at night. It could also be a nice finish to an elegant breakfast. Best of all, it's quick and easy. The trickiest bit is peeling the oranges, and you'll probably master that pretty quickly.

Also, if you bought orange flower water ages ago for a recipe where you used a mere teaspoon, and the bottle has just been sitting in your cupboard ever since, here's a fantastic use for it.

Moroccan Orange Slices in Flower Water

Serves 2 - 4

2 large navel oranges
1/4 cup orange flower water
1/4 cup sugar
Ground cinnamon (to taste)
Mint sprigs

Start by making a simple syrup from the orange flower water and the sugar. Bring it to a simmer, and cook it for about five minutes over low heat. Put it aside to cool. This makes twice as much syrup as you need, so you can put the rest in a small jar or bottle in the fridge until next time (or for pancakes), once you're done here.

Using a good, sharp knife, cut the top and the bottom from the orange. Don't hack the whole top end off, just take enough off the top of it until you're through the pith and can see the top of each section of orange. Stand the orange on end, and position your knife at an angle where the pith meets the flesh of the orange, with the blade facing down and angled out. Gently but firmly saw downwards to remove a strip peel-and-pith off of the orange. Re-angle your blade as you go to follow the shape of the orange. If you lose a bit of orange, that's okay. Turn the orange a quarter turn, and repeat cutting the strip away. Do this twice more, until each "side" of the orange has a strip of peel removed. Then you should be able to remove the remaining peel in four more slices (plus maybe an extra one or two to get little bits of pith that stayed behind). Turn the orange upside down, and remove any bits of pith that stuck to the bottom side. There always seems to be a few. Then, turn your naked orange onto it's side, and cut it into rounds about a centimetre thick. Repeat with the other orange. It's so much easier the second time!

Arrange the orange slices on plates, however you like. I like to remove the centre bit of core-pith, but that's up to you, and if the centres of the slices are a bit fibrous, you can use an apple corer or a sharp knife to remove those bits. Drizzle a tablespoon of syrup over each orange, and sprinkle with cinnamon. Garnish freely with fresh mint, and you're done.


I note that when we finished the orange, we mushed the mint leaves around in the syrup, and ate them too. Urp.

March 13, 2016

Moroccan Shredded Carrot Salad with Lemon Dressing


As I mentioned in the post on Preserved Lemons, we went to Marrakech last December. It is all still in my head, especially the flavours and sounds and scents of the markets and street food, and I am continue to investigate recipes for dishes that we experienced, as well as those that I regret missing the opportunity to experience.

This carrot salad is modelled after the one that was served to us upon arrival in our riad. As we were scheduled to arrive quite late in the evening, our host offered us the option of booking a dinner so that we could relax and enjoy our first evening, without struggling out into a very unfamiliar sort of place late at night after a day of travel. We gratefully accepted, and were sent a menu to pre-order from. The dinner included a choice of three salads from a list of about seven choices, one two-person tagine from a half-dozen compelling possibilities, and a dessert from again, a handful of options. Bread was of course served automatically on the side (Morocco likes to have bread of some sort at every meal) and wine was also available, despite the riad's owners/operators being muslim themselves.

One of the salads we chose was a shredded carrot with lemon, which arrived neatly domed on a plate. I remarked on how finely grated the carrot was, and how wet the dish overall appeared, as we dug into it. We were delighted with the intensity of the lemon flavour, and it automatically went into my mental "make this!" file. While Morocco is famous for its use of preserved lemon, this recipe uses fresh lemon juice only.

Moroccan Shredded Carrot Salad with Lemon Dressing

Serves 4

3 large or 4 medium carrots
2 tablespoons cilantro or parsley leaves
1 large mint leaf
4 tablespoons fresh lemon juice
4 tablespoons extra virgin olive oil
1/4 teaspoon of salt
1/4 teaspoon sugar (honey would also be fine)
1 clove of garlic, crushed
1/8 teaspoon ground cumin
1/8 teaspoon sweet paprika

Peel and finely shred the carrots, and put them in a non-reactive bowl (note that the carrot juice might stain plastic, so best use a glass or ceramic bowl). I used the fine side of a big box grater to do the shredding, which takes a while. If you have a mandoline or other fancy slicer, do whatever gets you the finest possible cut without turning utterly to mush.

Finely chop the cilantro (or parsley) and mint leaf, and stir through the carrot shreds until well distributed.

In a small bowl, whisk together the lemon juice with the olive oil, salt, sugar, garlic, cumin, and paprika. Taste the dressing and add more salt if needed. Pour the dressing over the grated carrots, stir well to combine, cover and refrigerate for at least two hours, to give the carrots time to soak up the flavours.

Spoon onto plates, or pack into a teacup or measuring cup (or small bowl) to make a tidy presentation. The juices from the salad may seep out from the edges quite a bit, so be prepared to blot the plate if you want to keep it clean. In the riad, this was served Moroccan style, meaning one each salad was served on a separate plate, from which we served ourselves, rather than the individual portion you see here.

January 16, 2016

Preserved Lemon


We spent last Christmas in Marrakech, and returned with a reignited love of North African flavours. The single most notable ingredient in Moroccan cooking, from my perspective, is the generous use of preserved lemon that occurs in everything from tagines to tangia, couscous to zaalouk. It is a key component of many of the signature dishes of the region.

I've talked about the wonderful depth of flavour one can get with preserved lemon in my Lemon Risotto recipe. Historically, I've made an Indian version of preserved lemon, namely a modified Nimbu Ka Achar (not the sweet version), which has the additional flavourings of a smidge of cayenne and turmeric, giving the finished condiment a deeply burnished yellow appearance, and a lightly spicy fragrance from the additional seasonings.

Today, I decided to make a more classic version, because I've planned a lot of Moroccan recipes in the next few months. The lemons will take about a month to cure before I can use them, and will continue to get better and better after that.

Preserved Lemon

1 sealable 500 ml canning jar with a clean new seal

4 unwaxed lemons
3 tablespoons coarse salt

Wash the lemons really well. If you have the misfortune to have access to waxed lemons only, you can clean them thusly: In a colander, pour boiling water over them to heat/loosen the wax. Immediately place them in a cool vinegar water bath. One lemon at a time, rub the wax off using a scrub made of baking soda and coarse salt on a damp, clean kitchen cloth. Rub and scrub and rinse under cool water, until the skin squeaks (like tupperware) when you rub it. Dry well and set aside. Or, you can google for a different wax removal system that suits you.

Fill your clean canning jar with boiling water, and let it stand. Let some of the water run over the inside of the lid, too, so it's best to do this in a clean basin or handy kitchen pan.

On a clean cutting board, slice three of the lemons lengthwise into eighths. Traditionalists leave the lemons joined at one end, that is to say, not cutting the whole way through, but I find it's quite hard to fit them all into the jar that way. So, I do one the traditional way, and the others I just slice into eighths. Discard any seeds.

Empty the boiled water from your jar. Sprinkle a little of the coarse in the bottom, and start layering your lemon wedges and salt into the jar, using all of the salt. If you are doing traditional lemons, connected at one end, pack some of the salt between the slices and into the middle. The lemons should just nicely fill up a 500 ml jar. Finally, take your last lemon, and squeeze the juice out. Discard the empty husks, and pour the juice over the salted lemon slices, and seal the jar. The juice will not cover the lemons, but rather will fill about half-way, depending on how juicy your lemons are.

That's pretty much all the work. Put the jar on a counter where you will see it every day, and once per day turn it upside down and back again, to make sure all the lemon gets bathed in the juice. After about four weeks, you can move it to the fridge, and you don't have to turn it anymore. Over time, the lemons will start to break down a bit, releasing more juice into the jar, and dissolving some of the pulp.

To use, unseal the jar and use a clean fork to extract however many segments you need. Re-seal the jar, and return to the fridge. I've kept one as long as a year and a half, with no signs of deterioration. The combination of salt and the extremely acidic environment seem to keep it from growing mould or unfriendly bacteria. That being said, food safety, folks. If something does go wrong with yours, and it starts growing something or smelling funky (in a bad way, because it does smell a bit funky in a good way already), use your judgment. I've never had one go bad on me, but I'm not ruling it out.

29 days to go...